
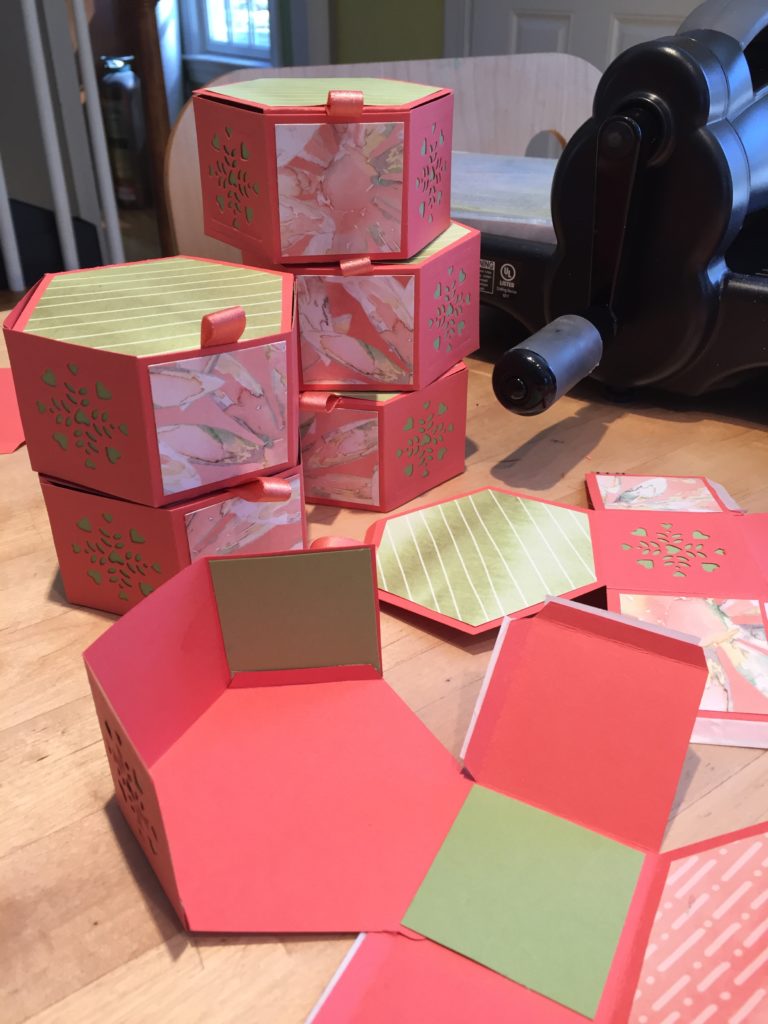
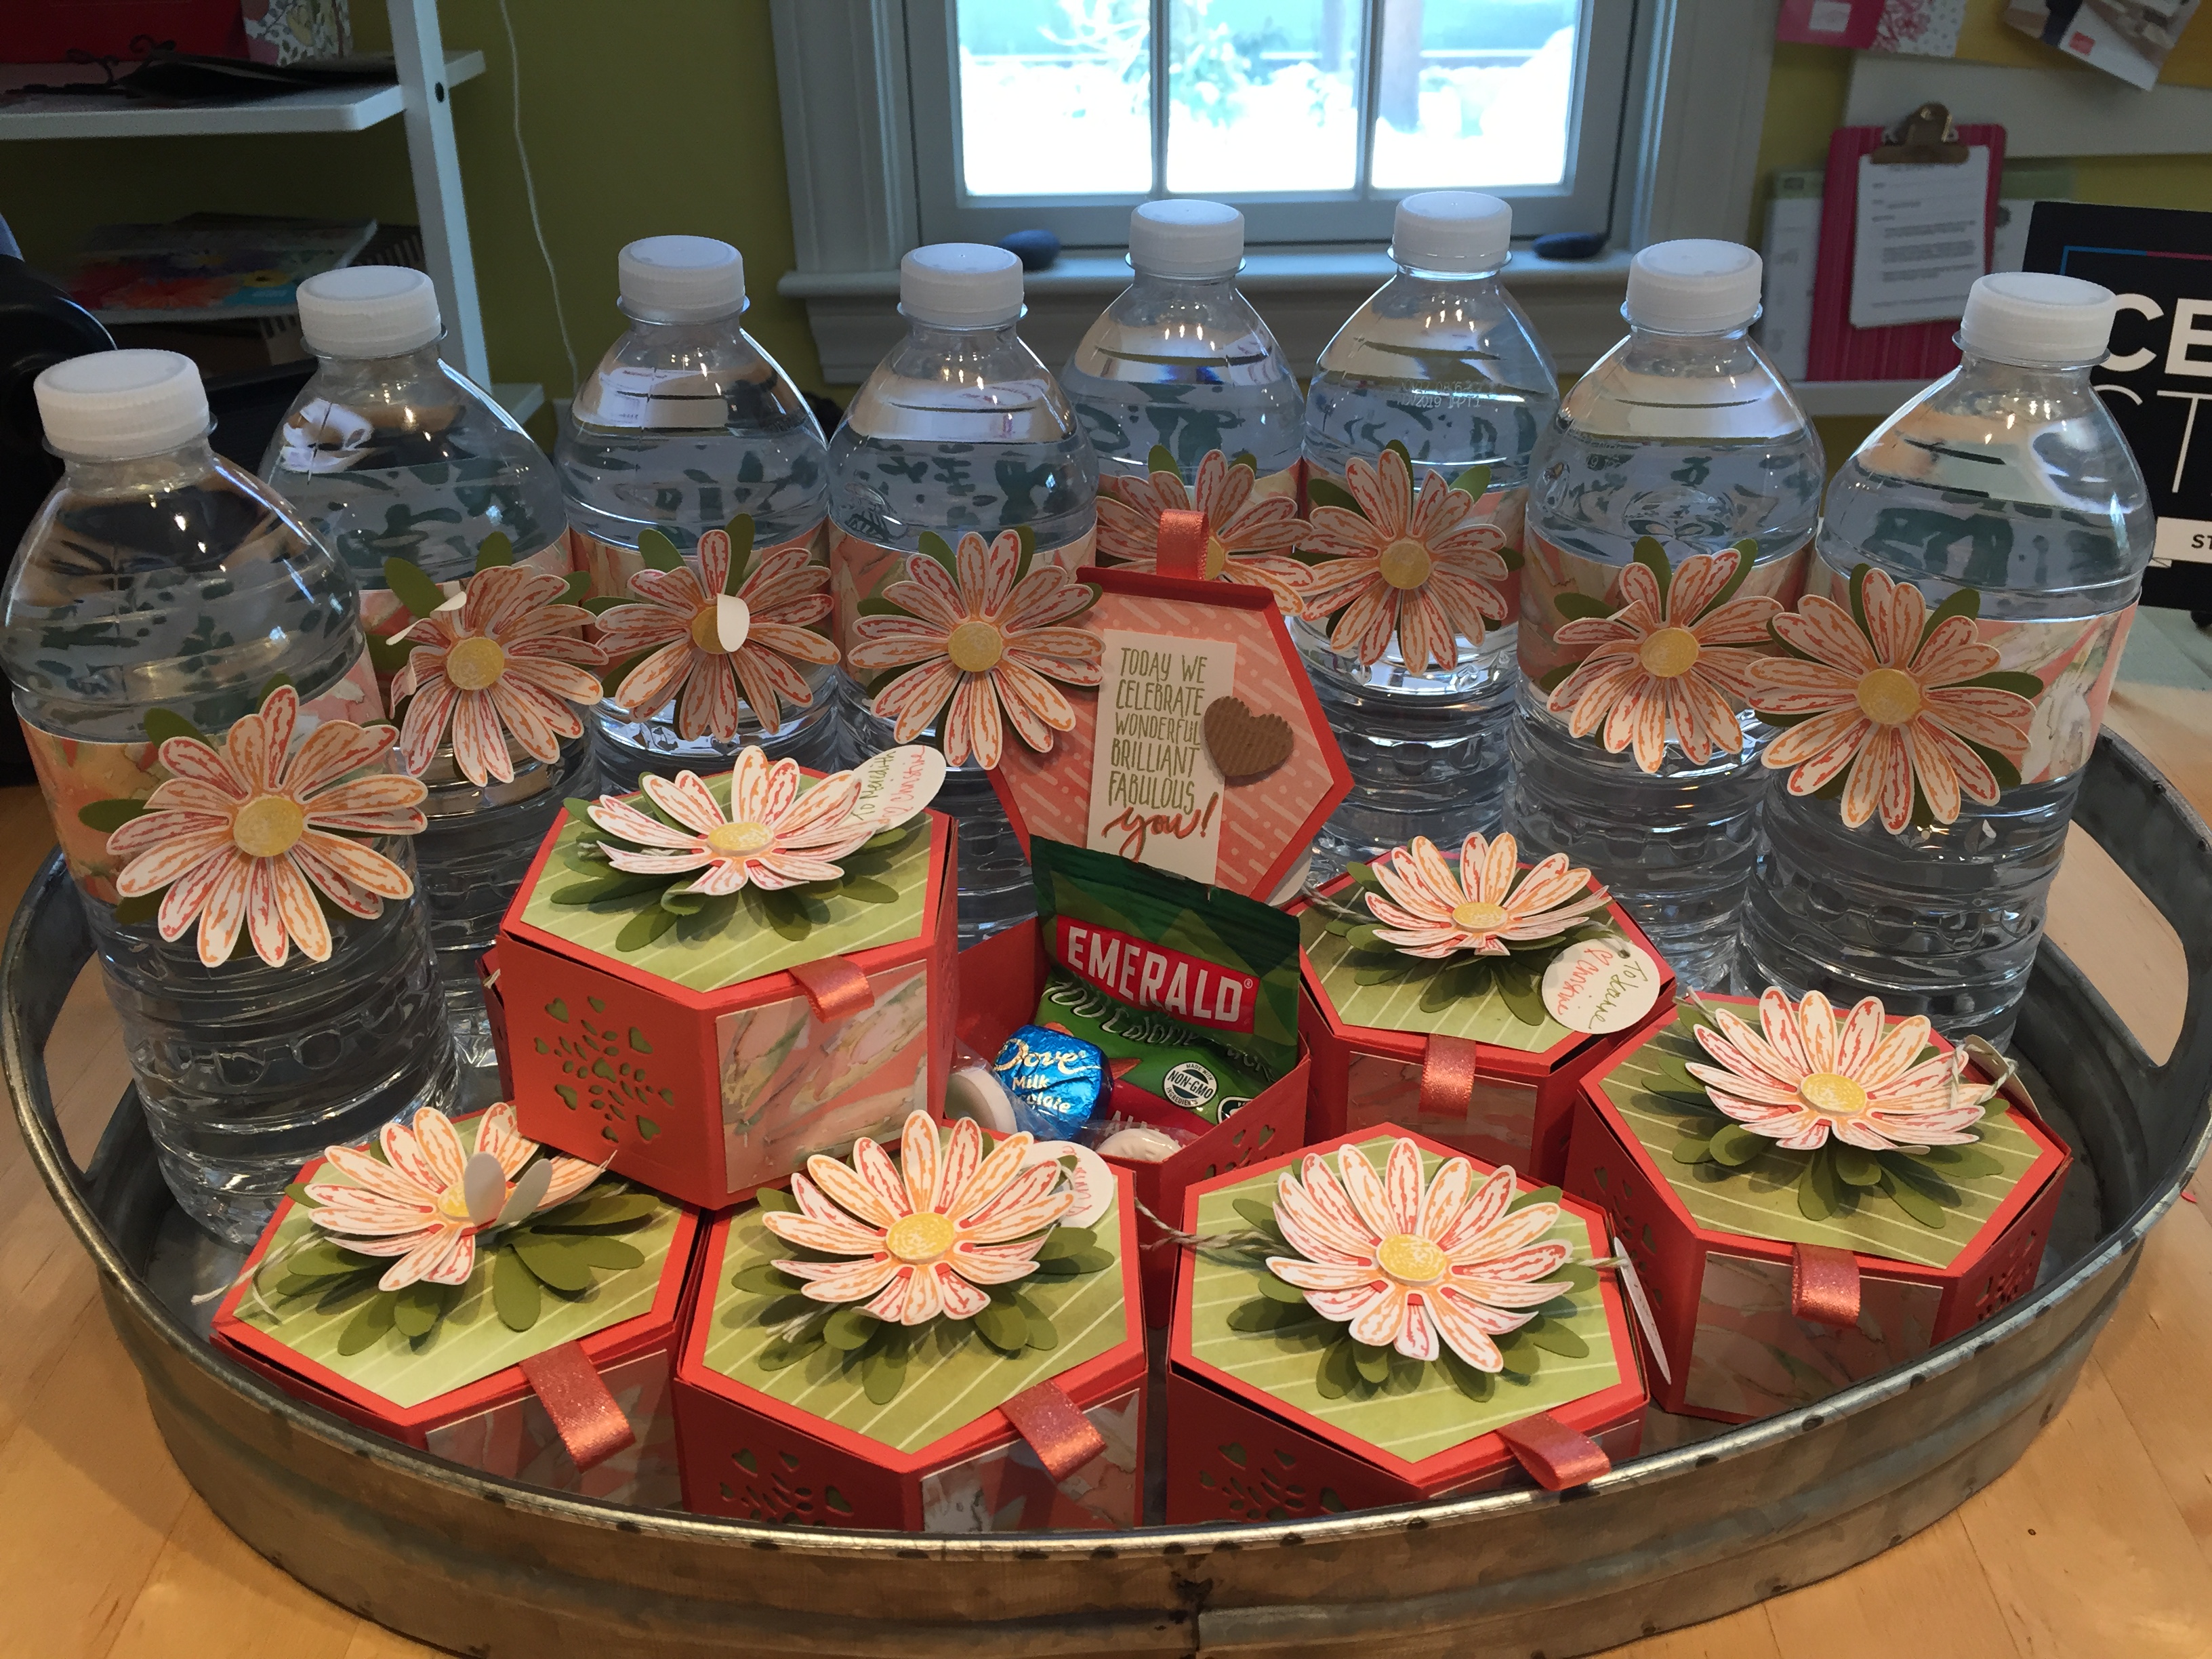
I just returned from a fabulous Stampin’ Up! OnStage event, in Hartford CT. Stampin’ Up! hosted several OnStage events this weekend at locations all around the globe. They announced many exciting things that I have to keep secret just a little bit longer. I LOVE attending Stampin’ Up! events for so many reasons: being the first to see new products, learning new techniques, winning new product prizes, and especially, being with fellow demonstrators. I have been lucky to attend several Stampin’ Up! events over the last few years and have made great friends. Some of them, I only see at these events. When we do get together, we like to make each other swaps and pillow gifts. Today, I wanted to share with you what I made for my fellow demo friends: a hexagon shaped treat box made with the Window Box Thinlits.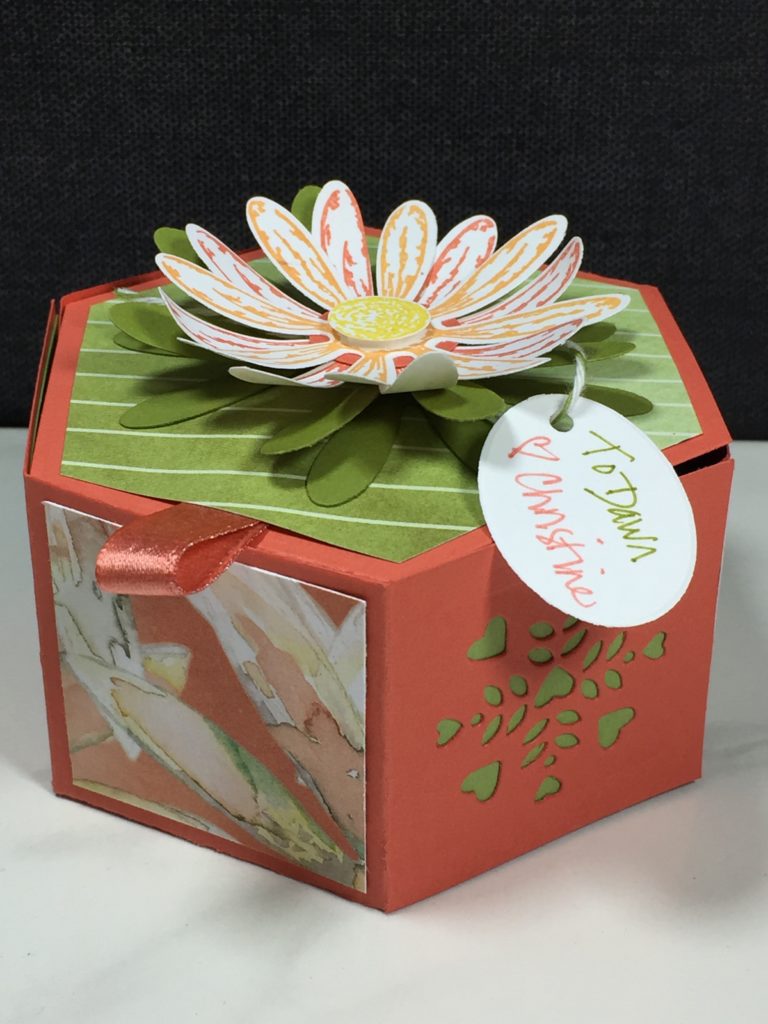 I recently used this same Window Box Thinlits dies to make an Easter basket. You can see that post here: https://mailsomethingpretty.com/make-easter-basket-using-window-box-thinlit/.
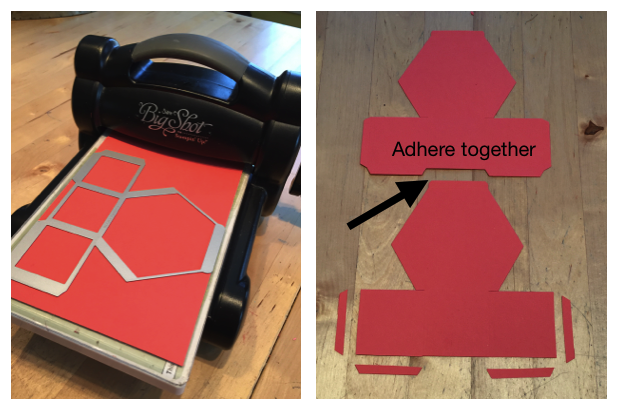
First Step: Using the Big Shot
The most important tools you will need for this box are your Big Shot and Window Box Thinlits dies. If you don’t have a Big Shot yet, let me tell you that it is a tool I use almost every day! It cuts paper with dies (shapes and templates), embosses card stock (gives paper texture) and can really elevate your project with just a crank of a handle. It is worth every penny.
Cut two pieces of cardstock using the Window Box Thinlits and Big Shot. As shown in the photo, cut off and discard the 4 tabs and adhere the two pieces together. I used Calypso Coral for the base of my box.
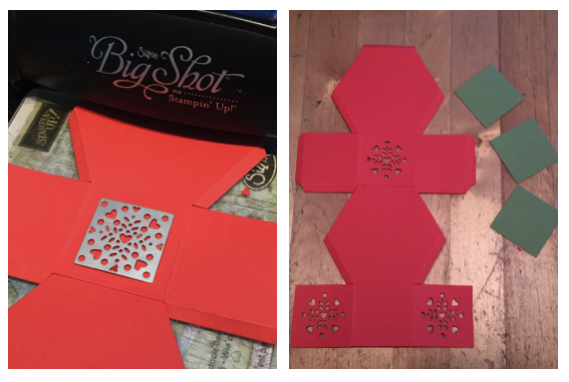
 Next, I used one of the detailed dies (there are three in the set) to create a “window” effect on the sides of the box. I chose to create this window effect on every other side.
Next Step: Assembling the Pieces
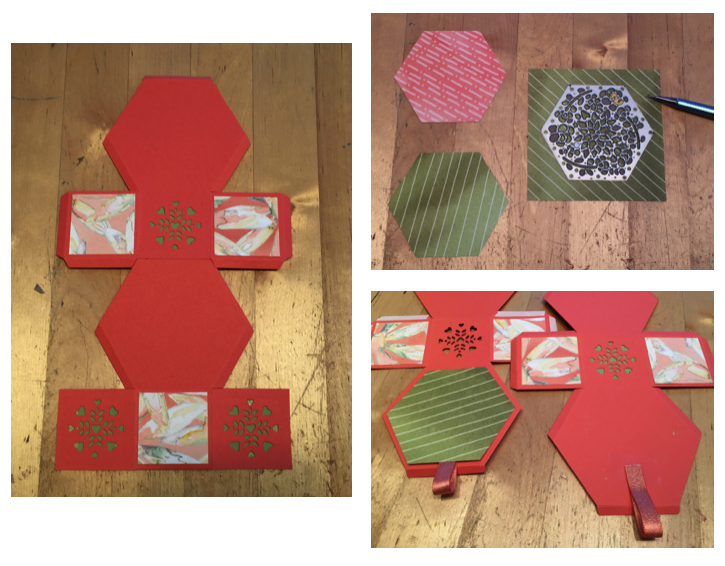
Cut three 1 5/8″ x 1 5/8″ pieces of patterned paper for the alternating sides of the box. You also need three 1 3/4″ x 1 3/4″ pieces (I used pear pizzazz) for behind the window cut outs (or, leave them as peek-a-boo sides). I used the hexagon shaped patterned die to trace around the edges of two different patterned papers with a pencil, and then cut them out with scissors. One piece for the top of the box and one for the inside top of the box. Cut 3 inches of ribbon and tape to the top of the box as a tab to open the box.
Adhering the Box Together
Use a strong adhesive such as Tear & Tape to seal the edges of the box together. You can see in this photo where I placed the Tear & Tape.
 To put the box together, fold on all the score marks, remove the Tear & Tape backing and fold/stick the sides together. It really comes together very easily.
Decorating with Details
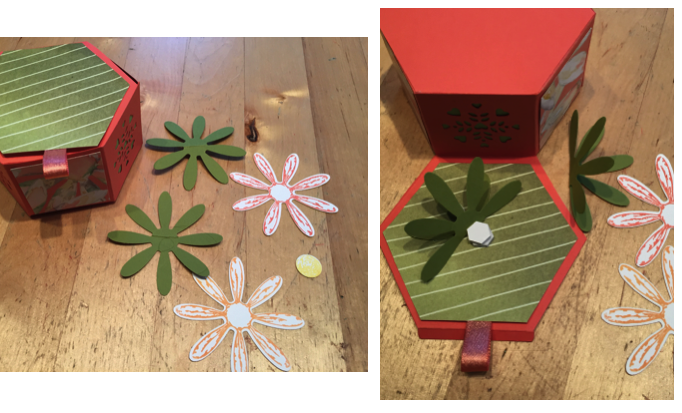
To decorate the top of the box, I used the Daisy Delight bundle (stamp set & punch purchased together saves you 10%). I stamped the daisy image in both Peek-a-boo Peach and Calypso Coral and the inner circle in Daffodil Delight. I also cut two Pear Pizzazz daisies. Place two Dimensionals stacked on top of each other (this gives height for the daisy) in the center of the box top. Fold the green daisies in half and glue to the top of the box on either side of the dimensionals. I used my bone folder to curl the edges of the daisy and taped them together off set. Use one more dimensional for the yellow center.
You will see I decorated the inside of the box with a stamped image and textured heart. The sentiment comes from the Picture Perfect Birthday photopolymer stamp set and the heart comes from the Corrugated Elements embellishments. I stamped the image with Pear Pizzazz ink and then wrote over the “you” with a Calypso Coral Stampin’ Write Marker. A very easy way to get two colors on one image.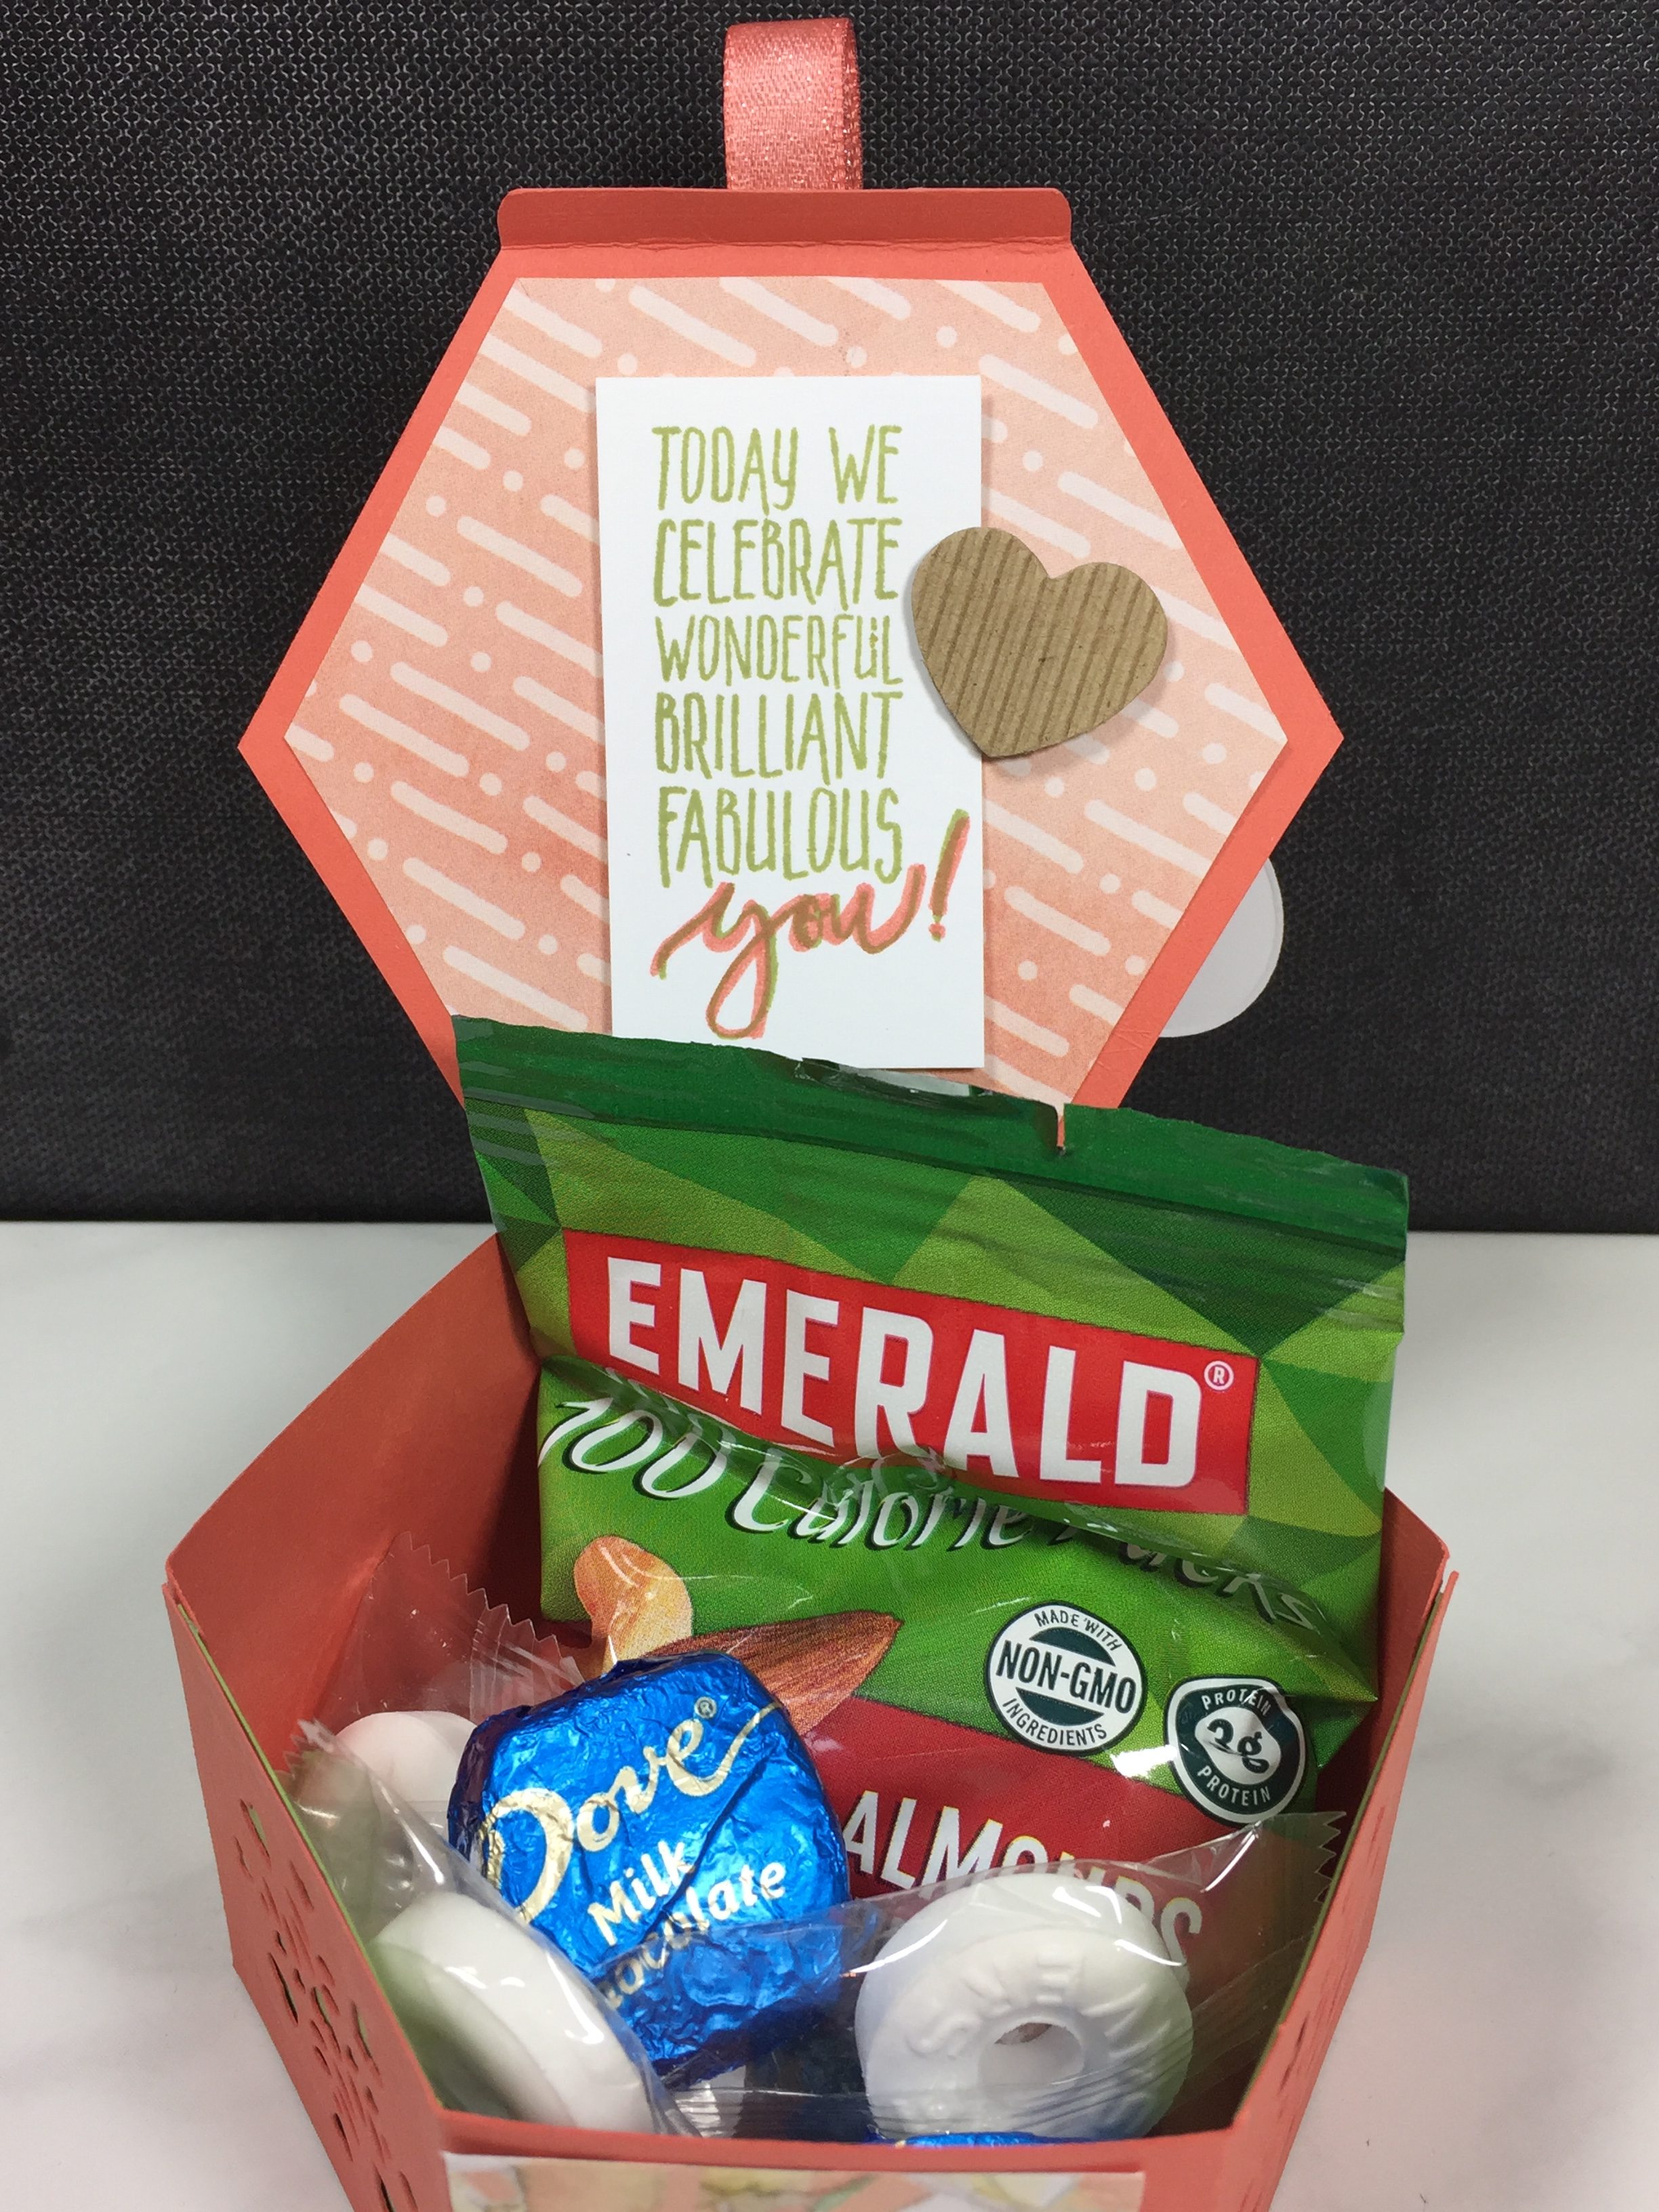
Fill your Box with Treats
An individual pack of nuts fits in the box perfectly with two dove chocolates and a couple of mints. You will also see that I labeled each box. The oval tag shape is included in the Window Box Thinlits. I used my coordinating Stampin’ Write Markers to write on each tag and tied it with the Old Olive Baker’s Twine. I decorated the water bottles to match the treat boxes. We love coordination right? Remove the label on your water bottle and measure. Just be sure to cut an extra 1/2″ in length for the adhesive to overlap. I think this one was 1 1/2″ x 7″.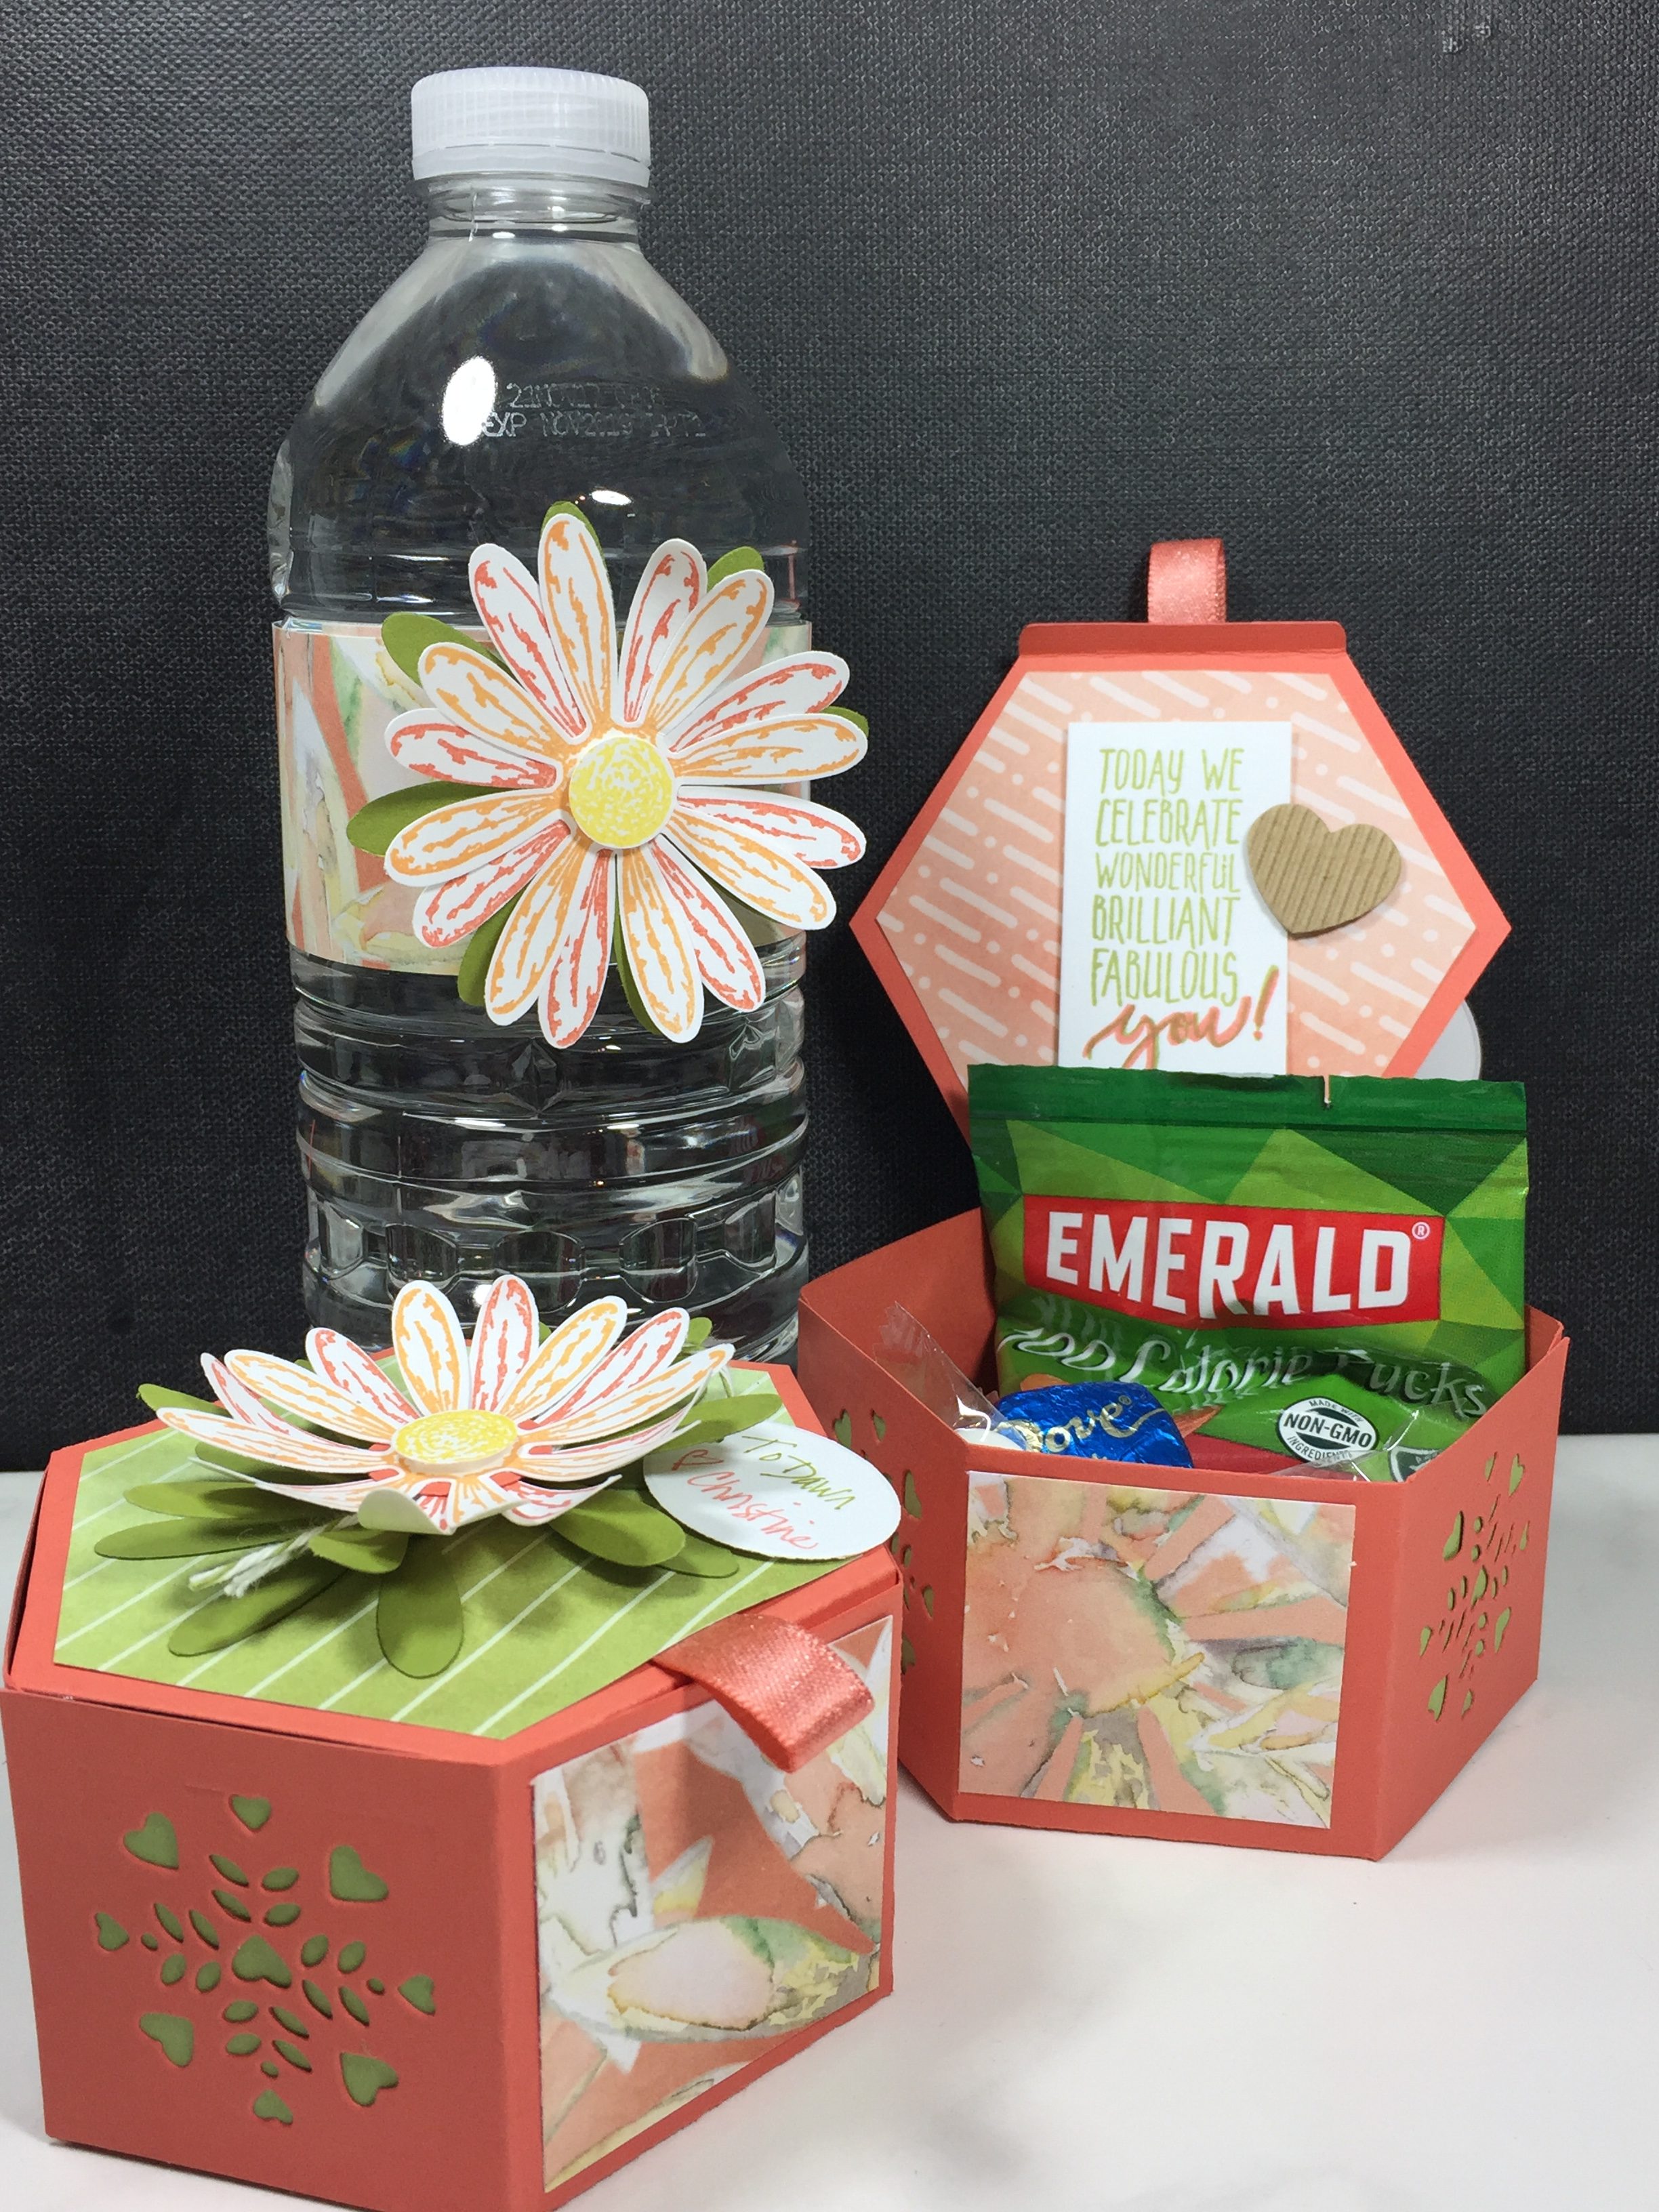
These treats were a huge hit! It’s always fun to make treats for others (and receive them too). I received some fun treats in return that I will share on my Facebook Page: Mail Something Pretty. Be sure to “like” my page, see all of the fun treats, and lots of other great information too. There are lots of photos and tips I post there that I do not post on this blog – so don’t miss out! I also invite you to become a team member, so you can attend these incredible events too.
The next big event will be celebrating Stampin’ Up!’s 20th Birthday. It will be in November in Orlando FL. To find out more about joining Stampin’ Up! and my team, please read here: https://mailsomethingpretty.com/thinking-about-joining-stampin-up/
I hope you like these hexagon shaped treat boxes that I made with the Window Box Thinlits, as you can see, they are not too complicated, but have a very big WOW factor. As always, I invite you to write your comments below 🙂


How sweet and thoughtful!
Thanks Tracy! They really were a lot of fun to make and by doing it assembly style, they didn’t take too long (I even kept one for myself)!