When I ask stampers what is something they would like help with, many times the answer involves Designer Series Paper. The responses vary between being a paper “hoarder”and having too much, not wanting to cut it or, not sure how to use it. Packs of Designer Series Paper generally come in two different sizes: 12″ x 12″ and 6″ x 6”. Today’s post focuses on the 6″ x 6″ size. Specifically on Creating Card Designs with 6″ x 6″ Designer Paper.
I will admit that the 6″ x 6″ size is not my favorite size. I feel that a lot of paper is left over and wasted after using it for larger card layers. This is why I cut my Paper Share’s into 6″ x 12″ instead of 6″ x 6″, like many other Demonstrators do. However, I am learning better ways of using the 6″ x 6″ size and using all of it. And I want to share these ideas with you. These two cutting templates have no scraps left over, which makes it ideal for 6″ x 6″ Designer Paper. Let me show you some card designs I came up with using these cutting templates.
Cutting Template #1 for 6″ x 6″ Designer Paper
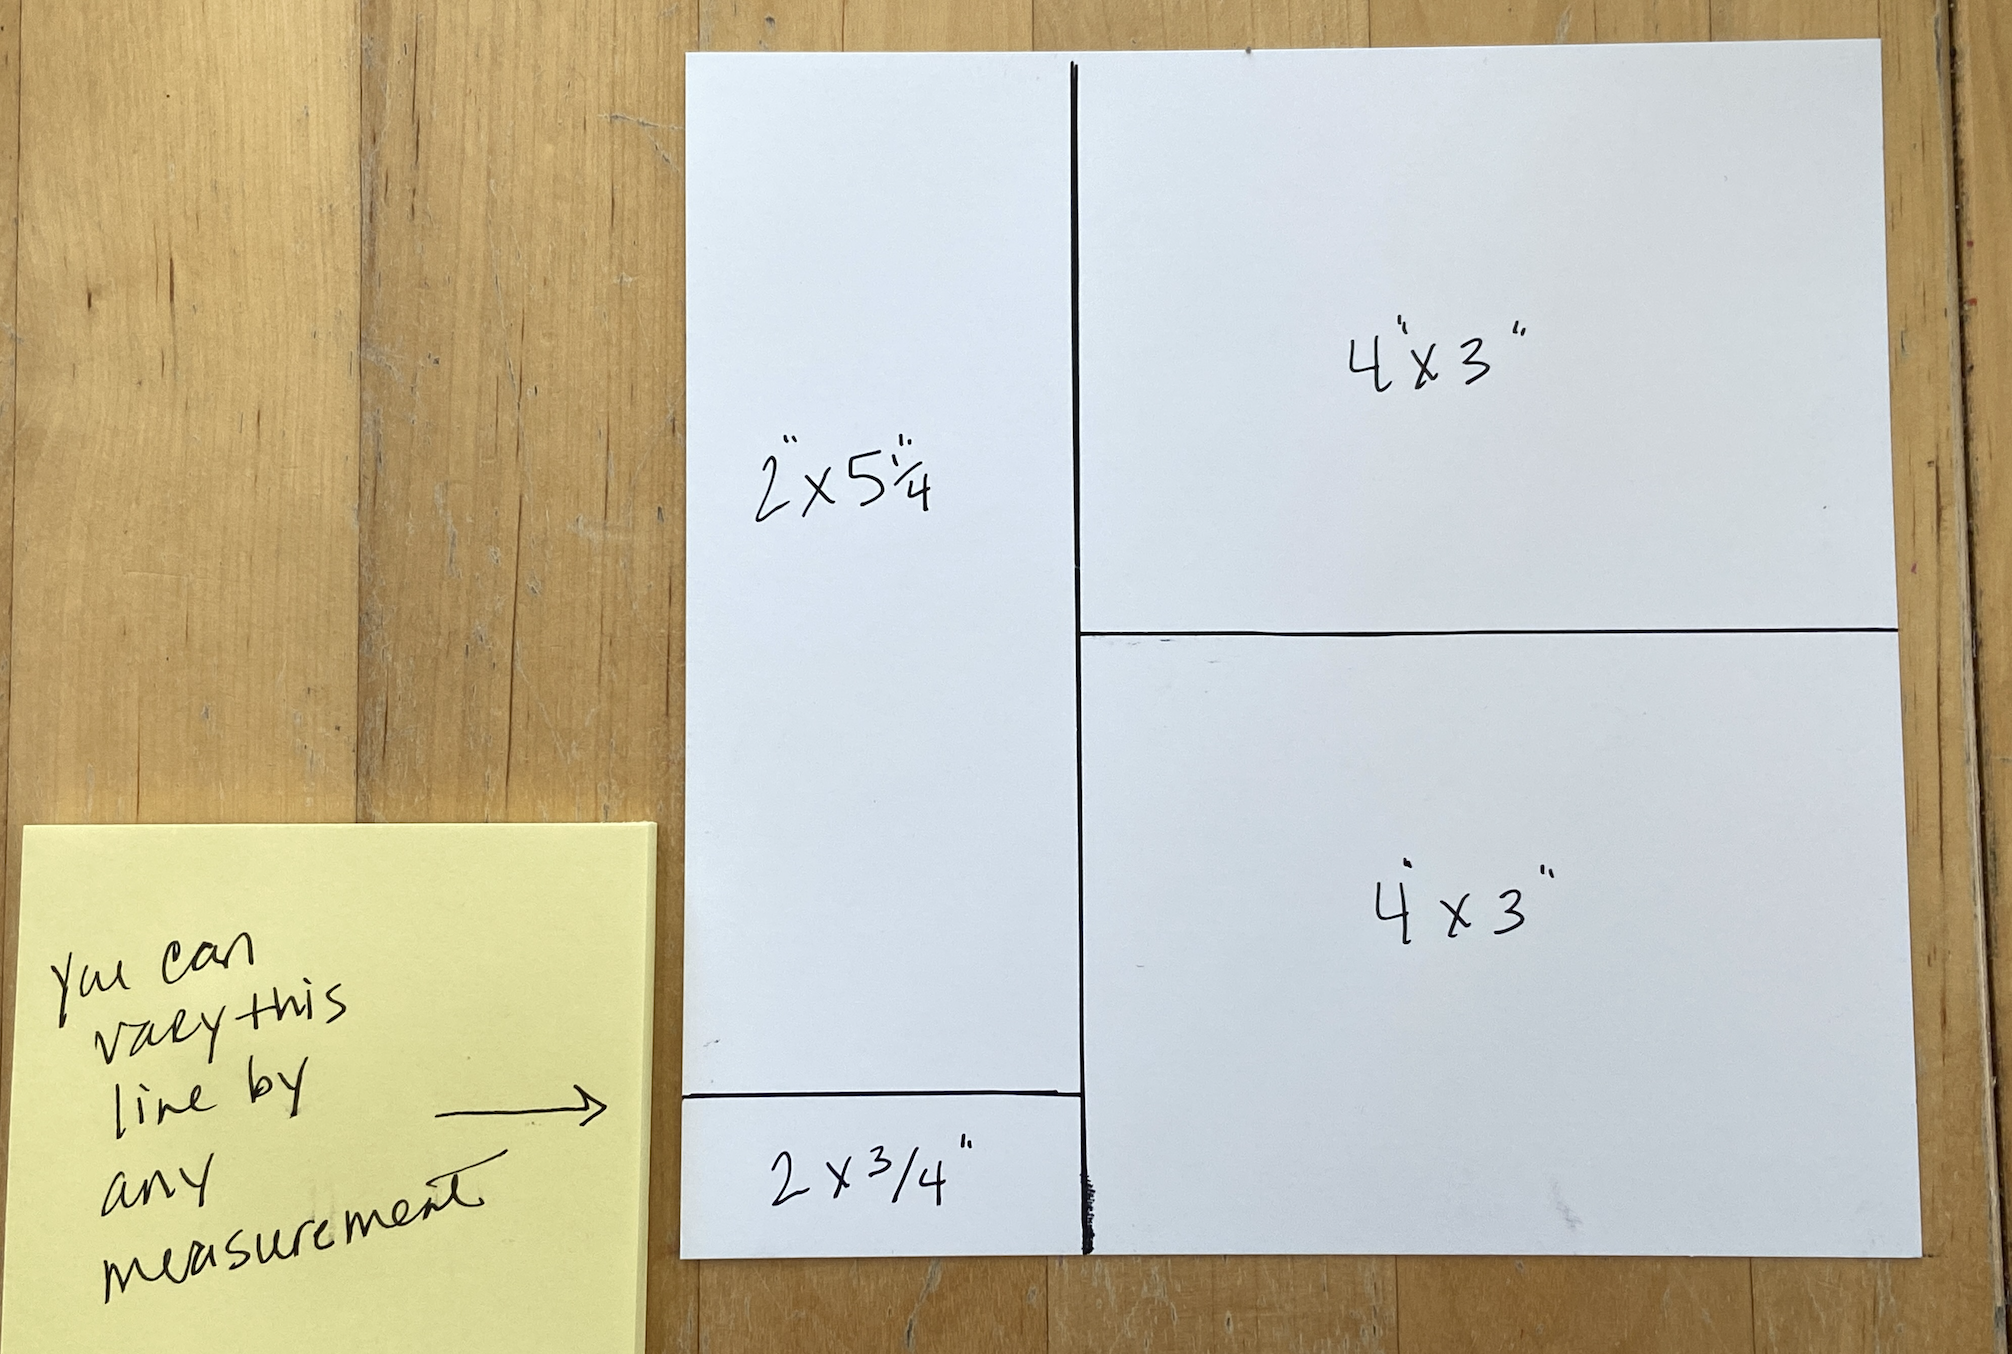
You’ll want to cut the 2″ vertical line first and then cut 3/4″ off the bottom (or as indicated, you can make this any measurement). Divide the remaining piece in half, which will give you two 4″ x 3″ pieces.
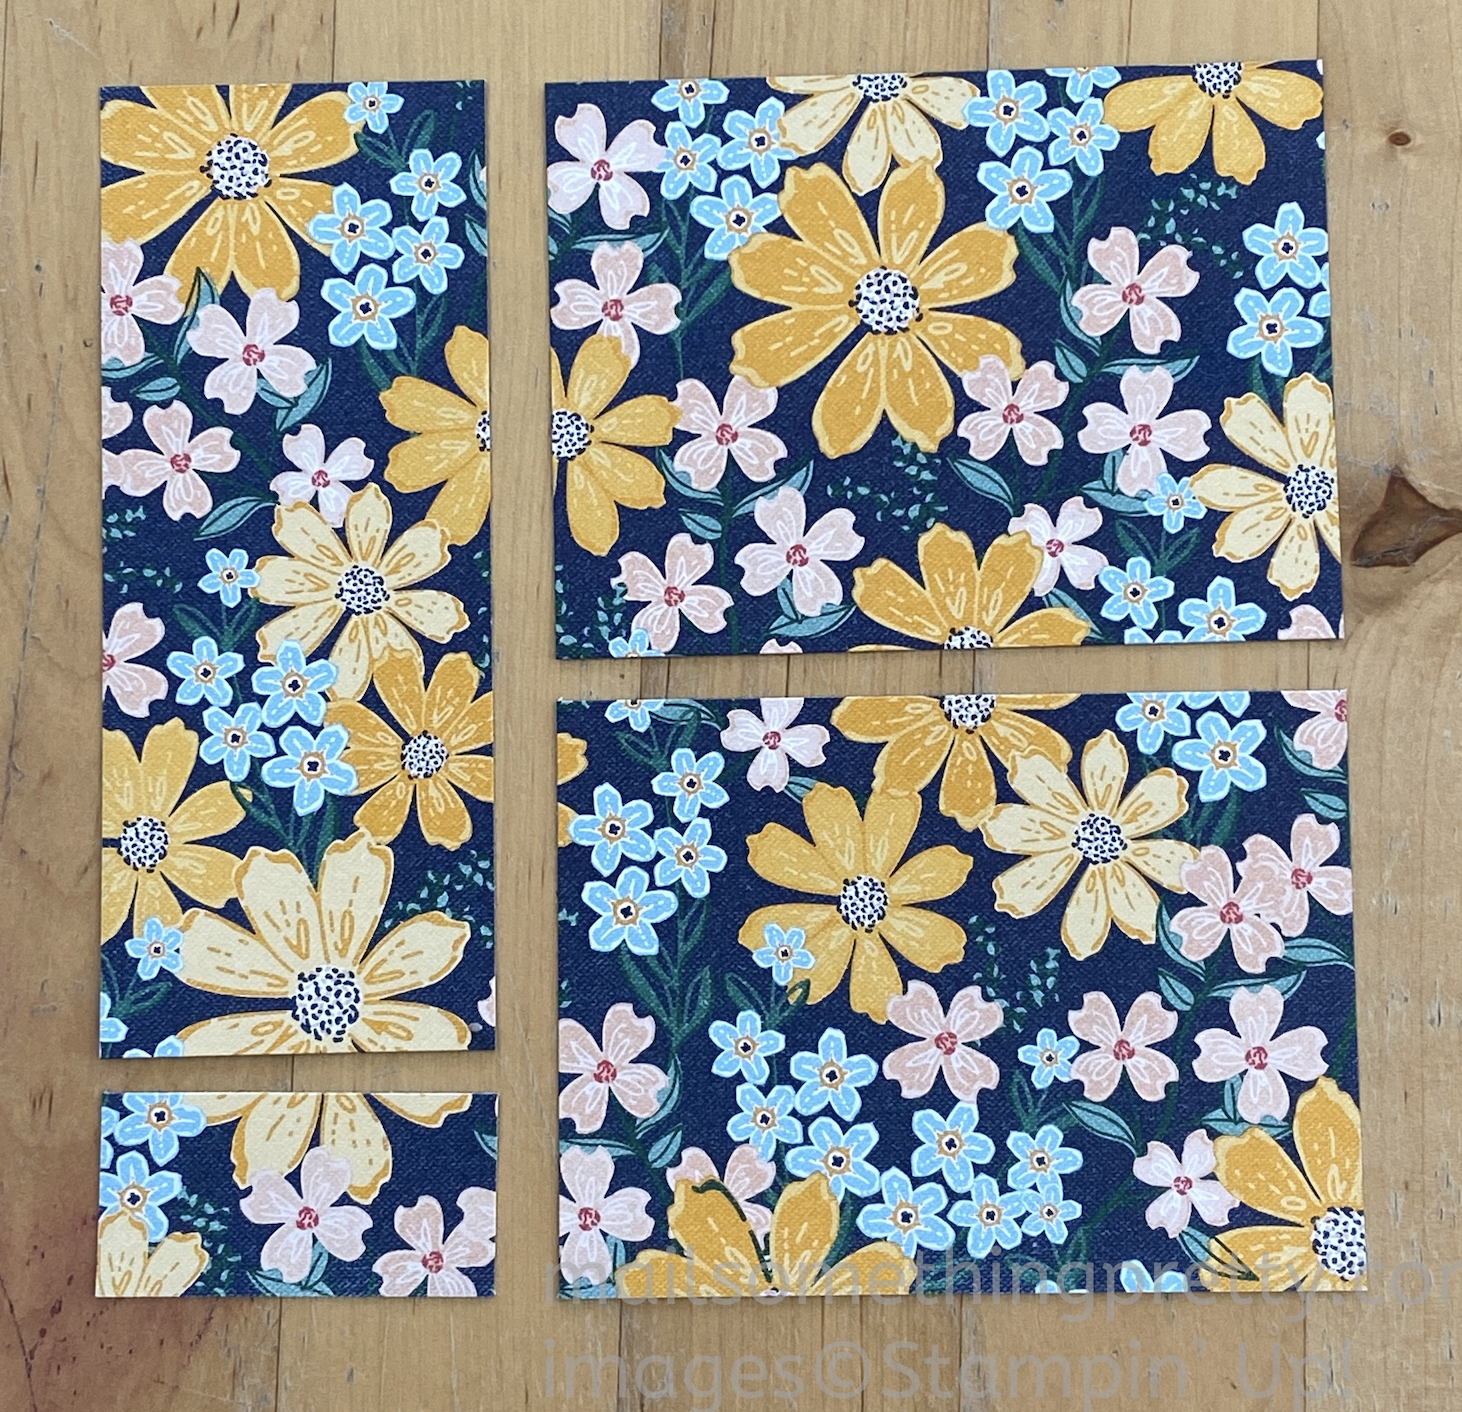
This is what the paper looks like with the cuts. I’m using the Regency Park Designer Series Paper and Cane Weave 3D Embossing Folder from the 2023 Mini Catalog and Night of Navy card stock in the following examples. You can use any paper you already have to copy these layouts, or click the links to order the products I used.
In the following examples, I use the Stylish Shapes Dies for all of the label/sentiment cut outs. You can easily substitute shapes you already have (although these dies are my favorites). I use the sentiments from the Sale-a-bration Thanks a Bunch stamp set (showing that you don’t have to make carrot centered cards with this stamp set).
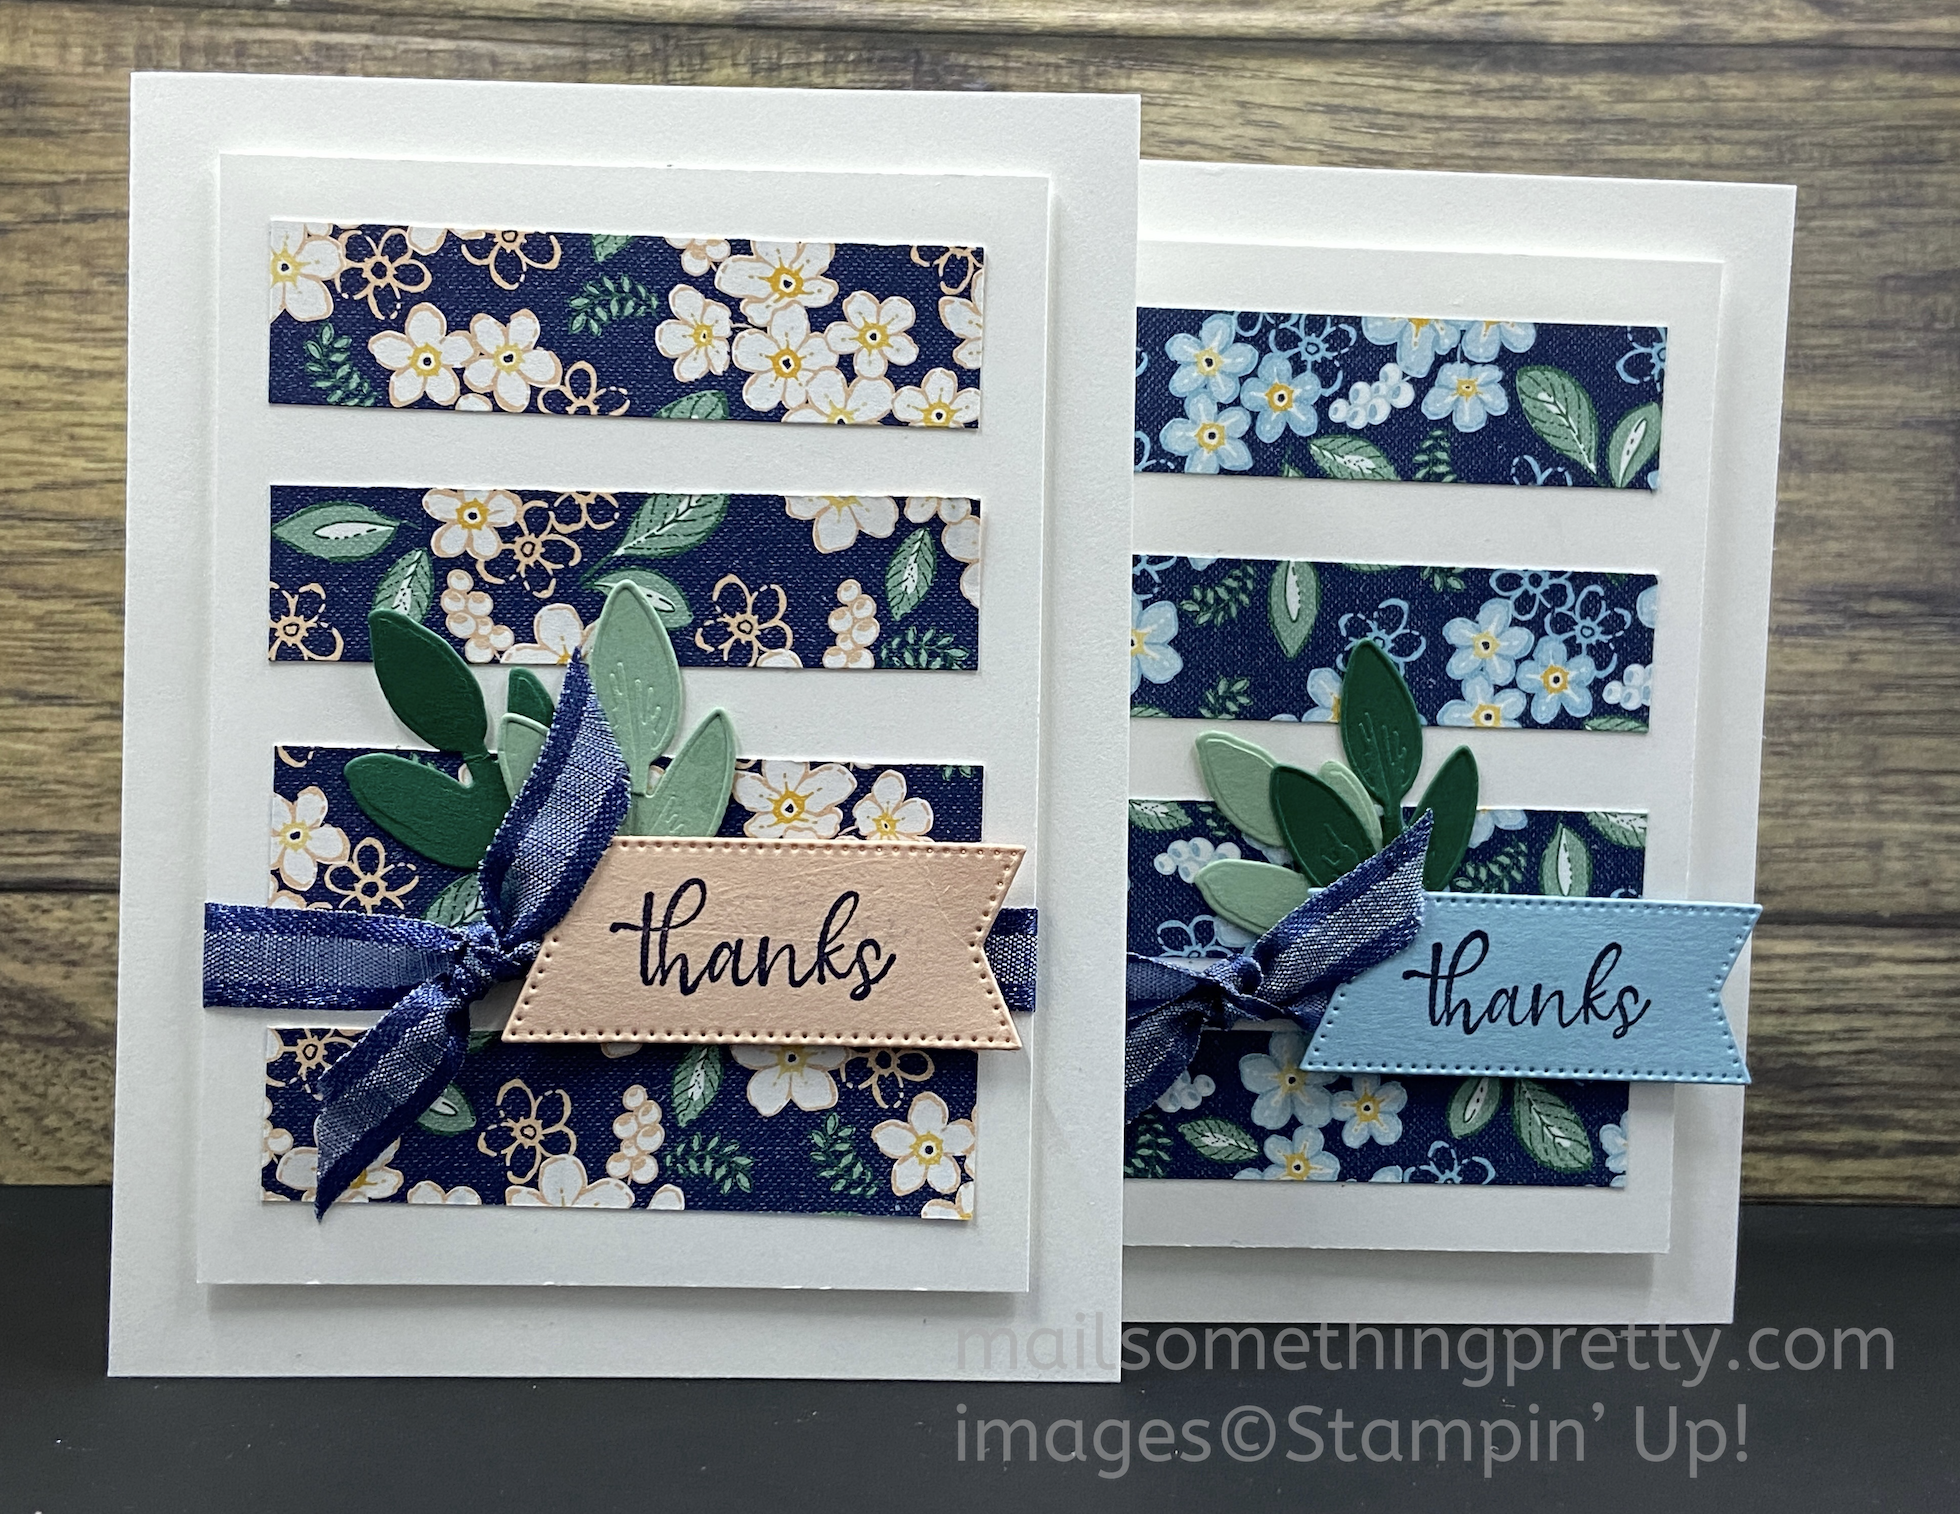
Card 1
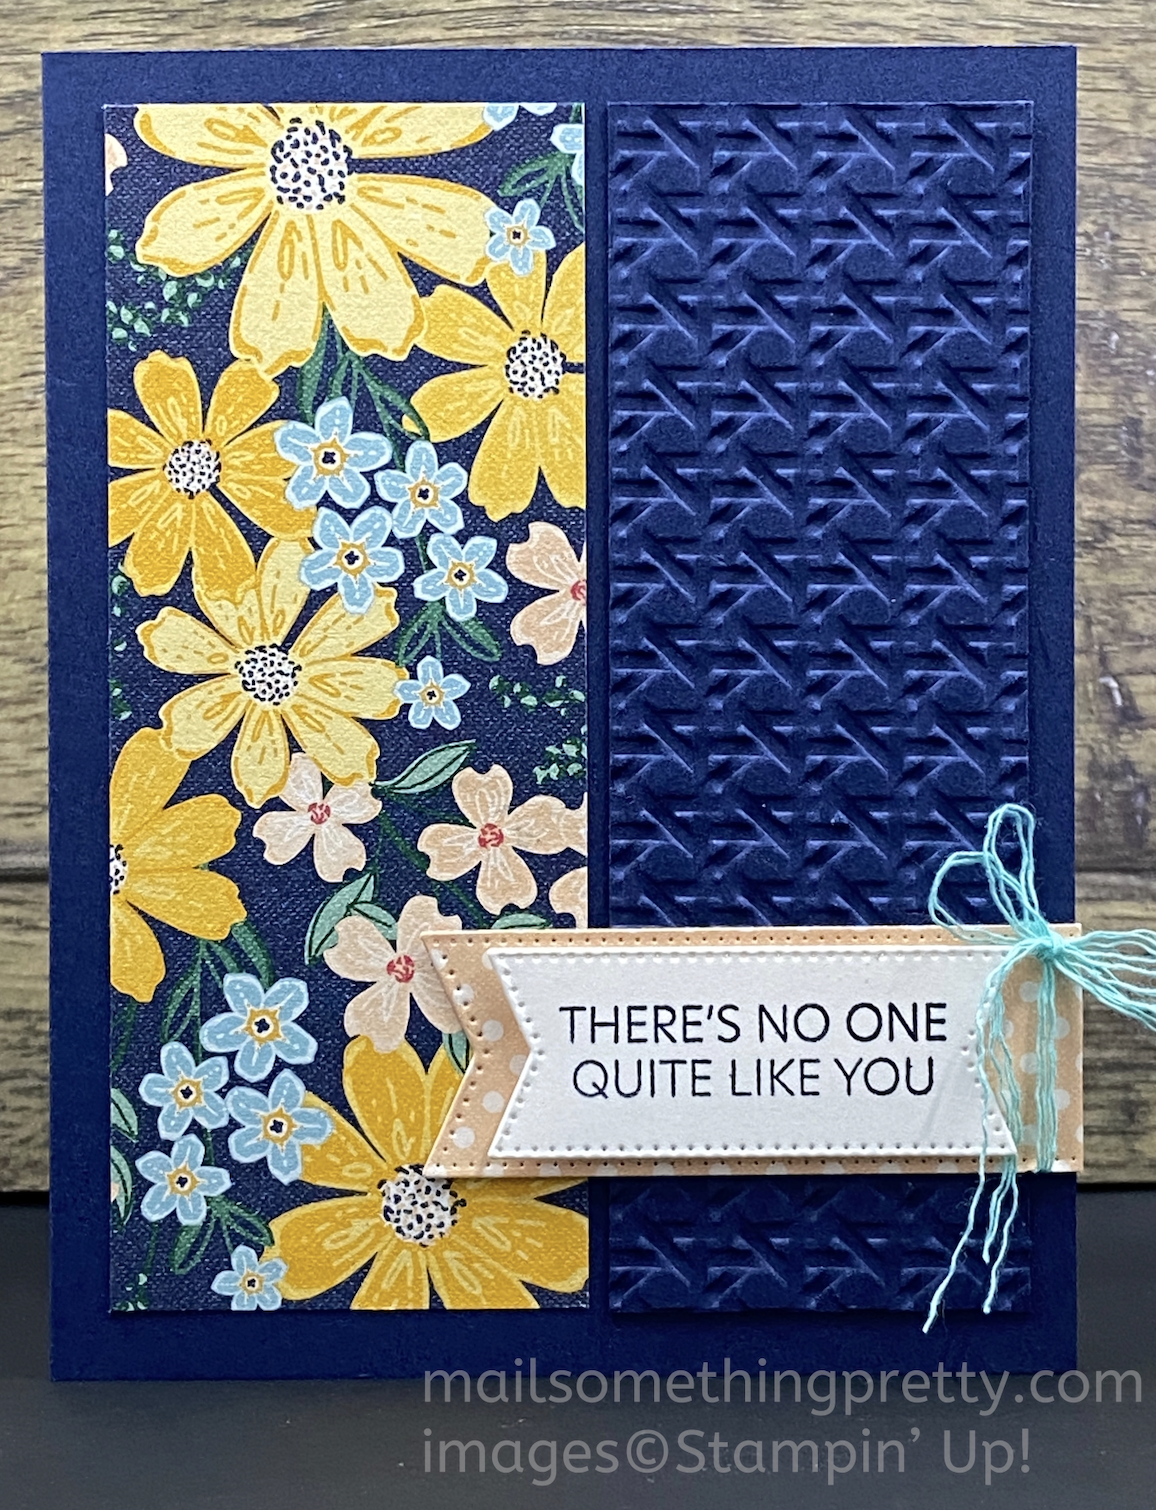
This first example uses the vertical 2″ x 5-1/4″ section that I cut first. I mirror it with a 2″ x 5-1/4″ piece of Night of Navy card stock that I textured with the Cane Weave 3D Embossing Folder. The polka dot piece is from the same Regency Park paper pack.
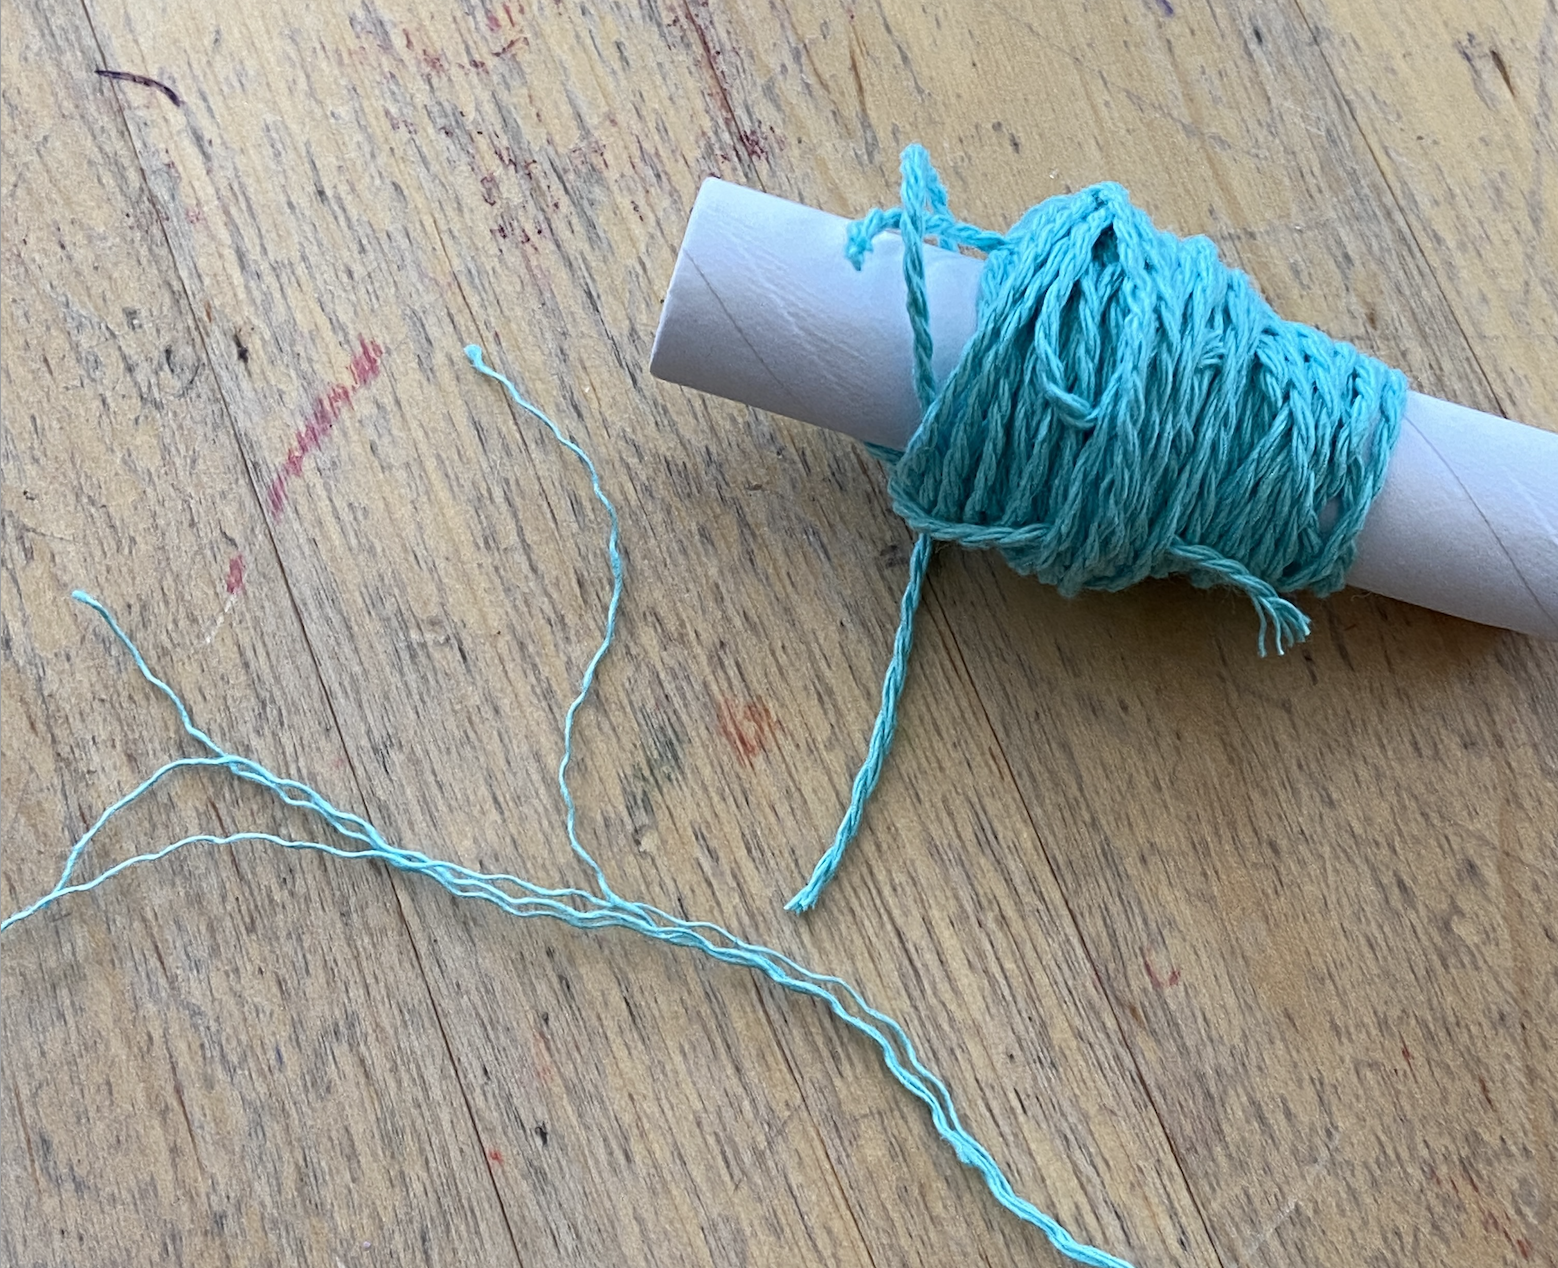
Here’s a little tip for the twine. This particular twine is a bit on the thicker side so I unraveled it to individual strands, which I tied around the sentiment. This gives a much lighter look.
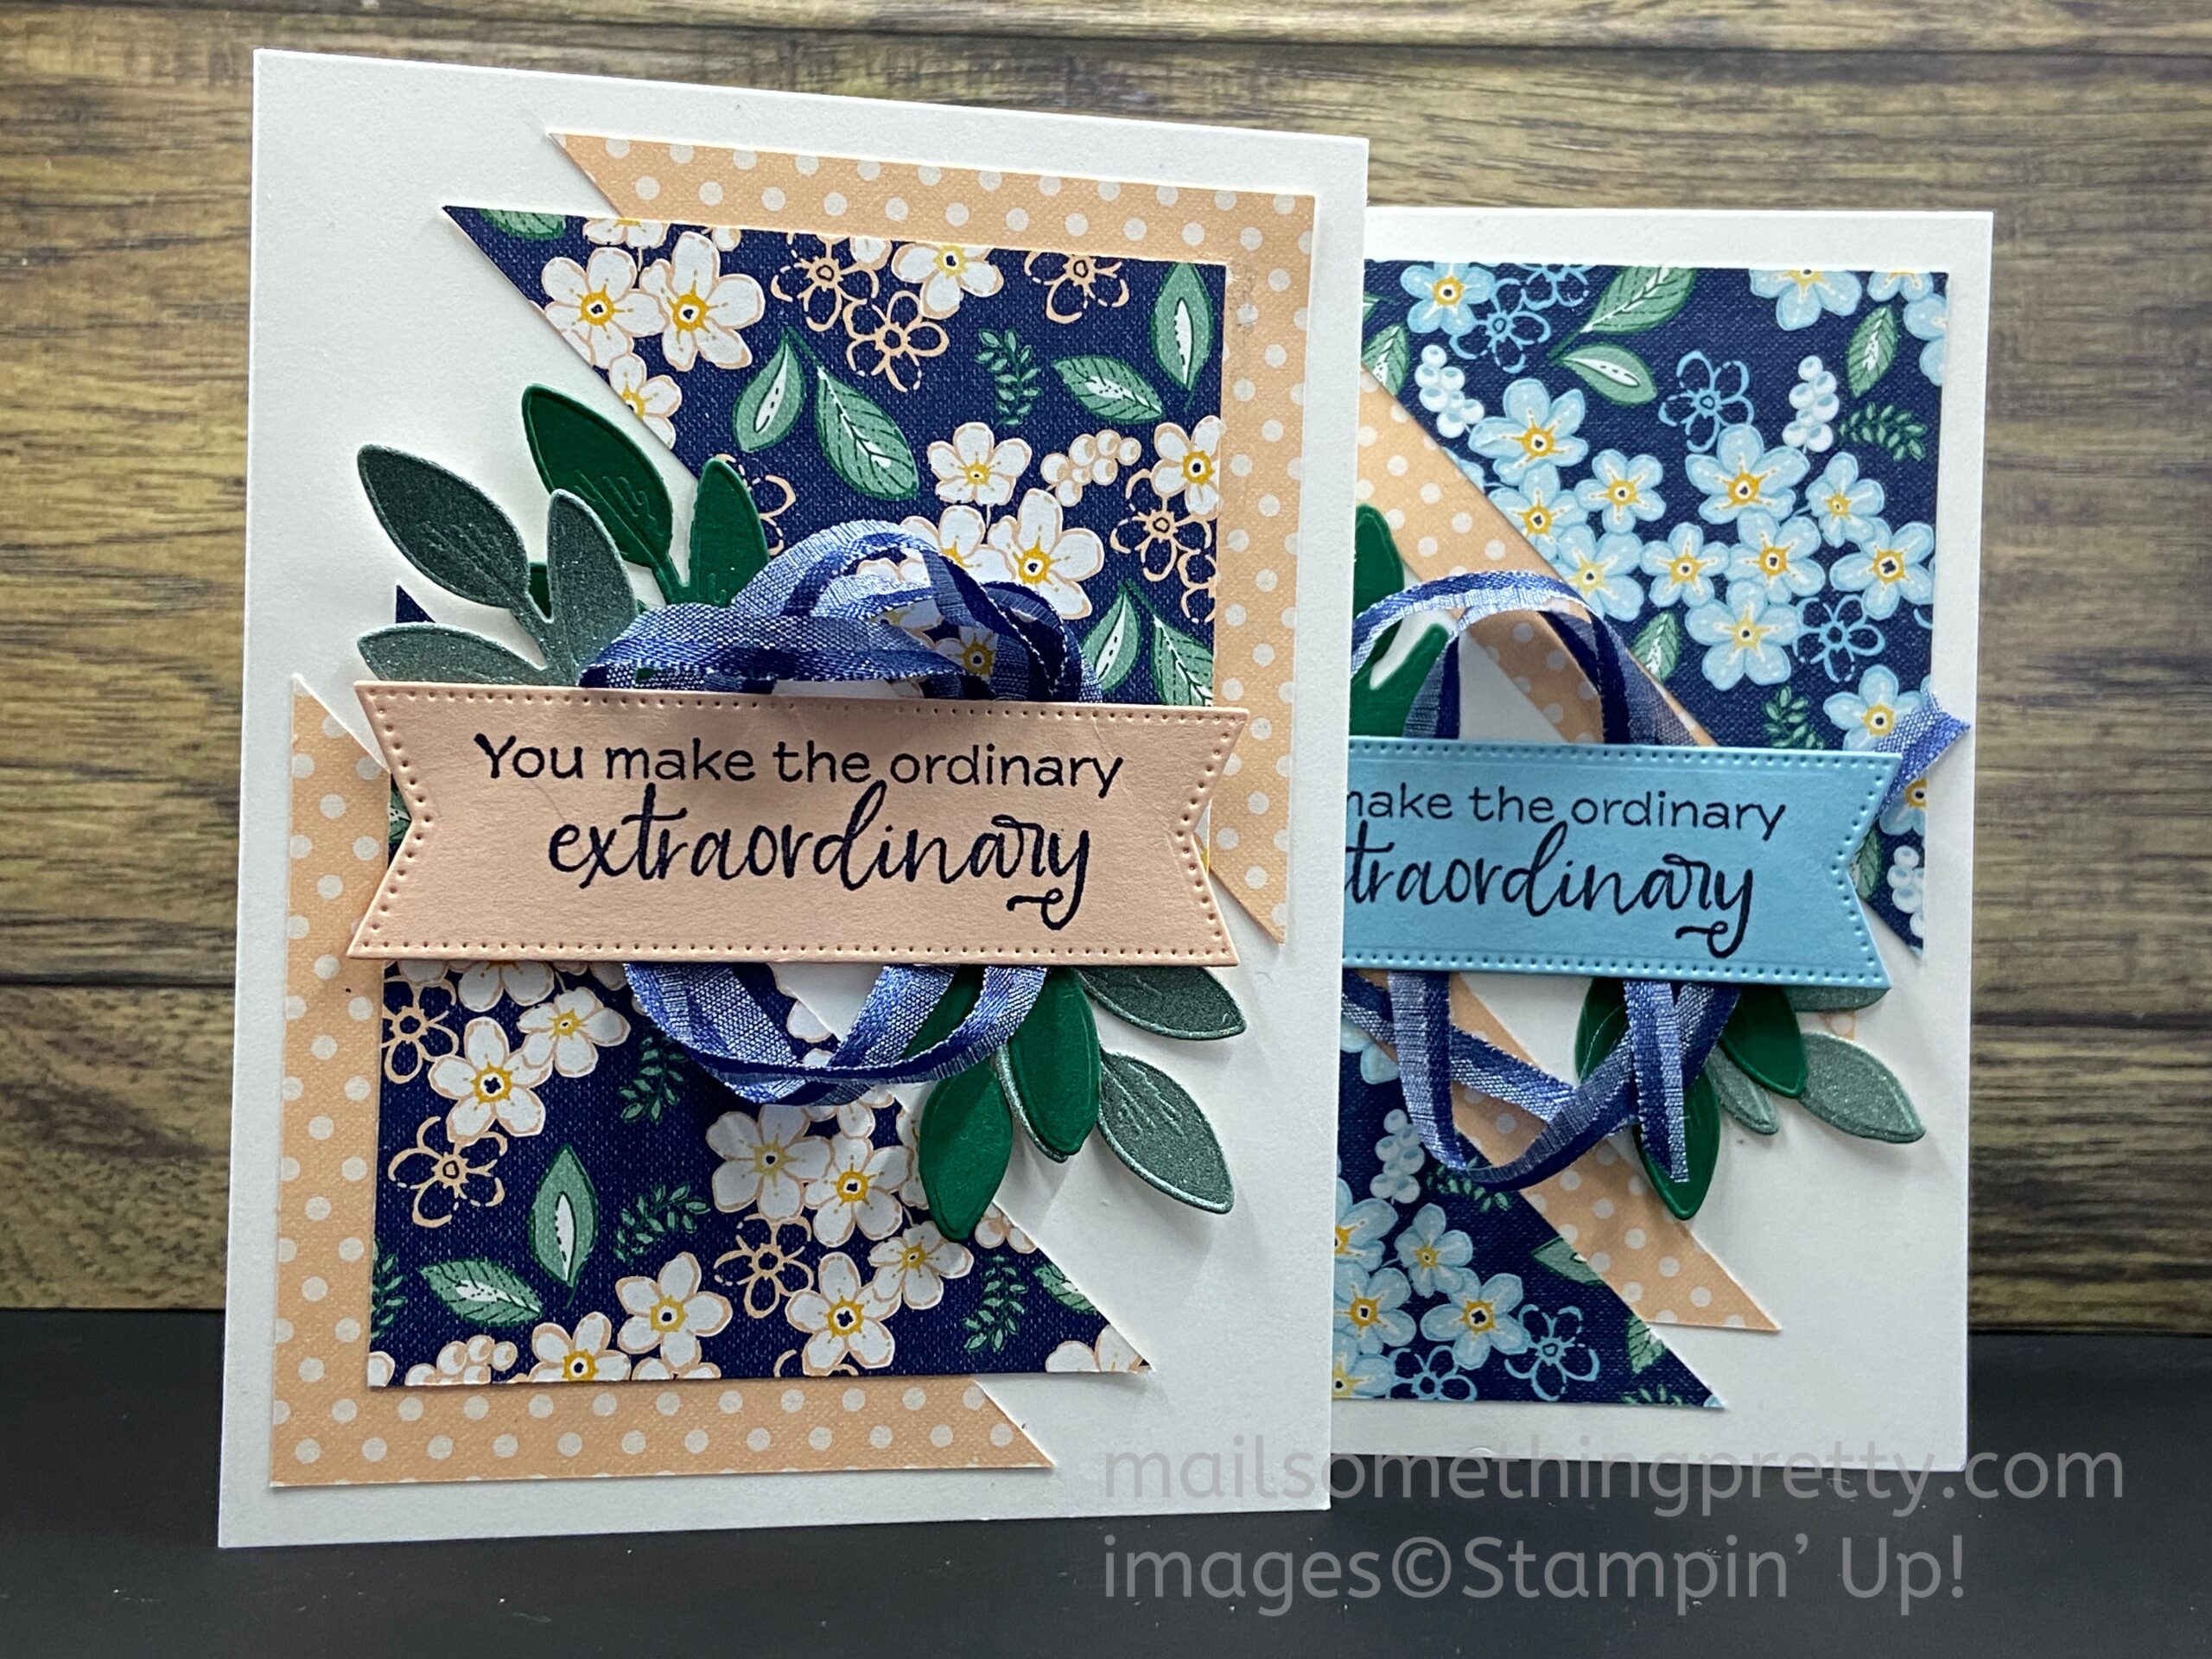
Card 2

This card uses one of the 4″ x 3″ sections that is raised up from the base with Dimensionals and also uses a 2″ x 5-1/4″ Night of Navy embossed layer. A little bit of ombre ribbon is folded under the sentiment.
Card 3
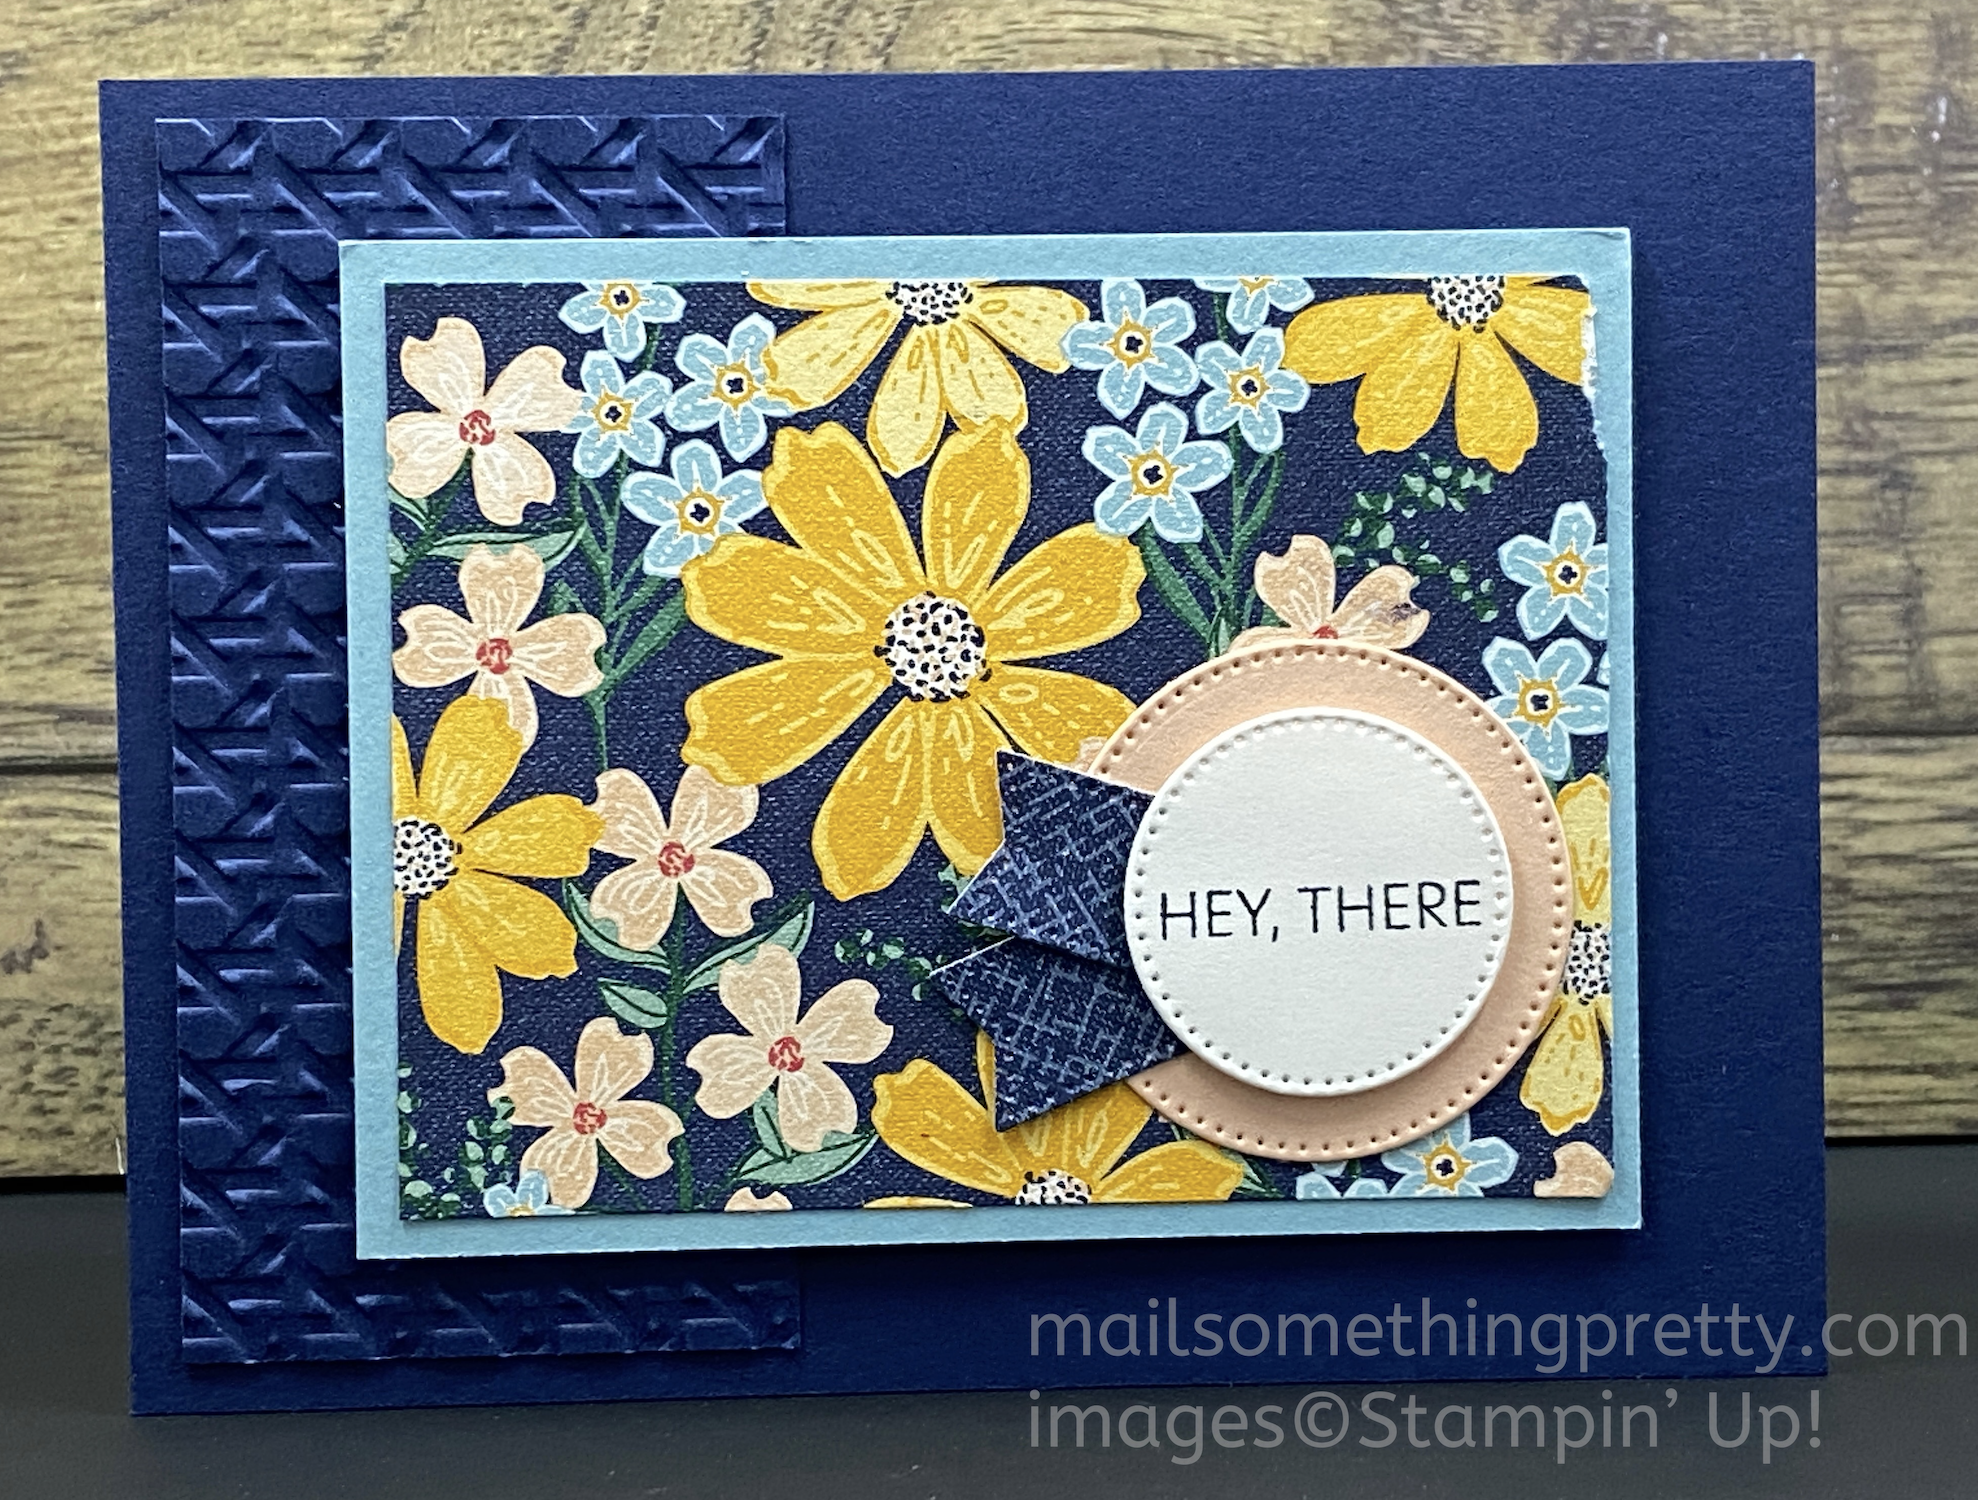
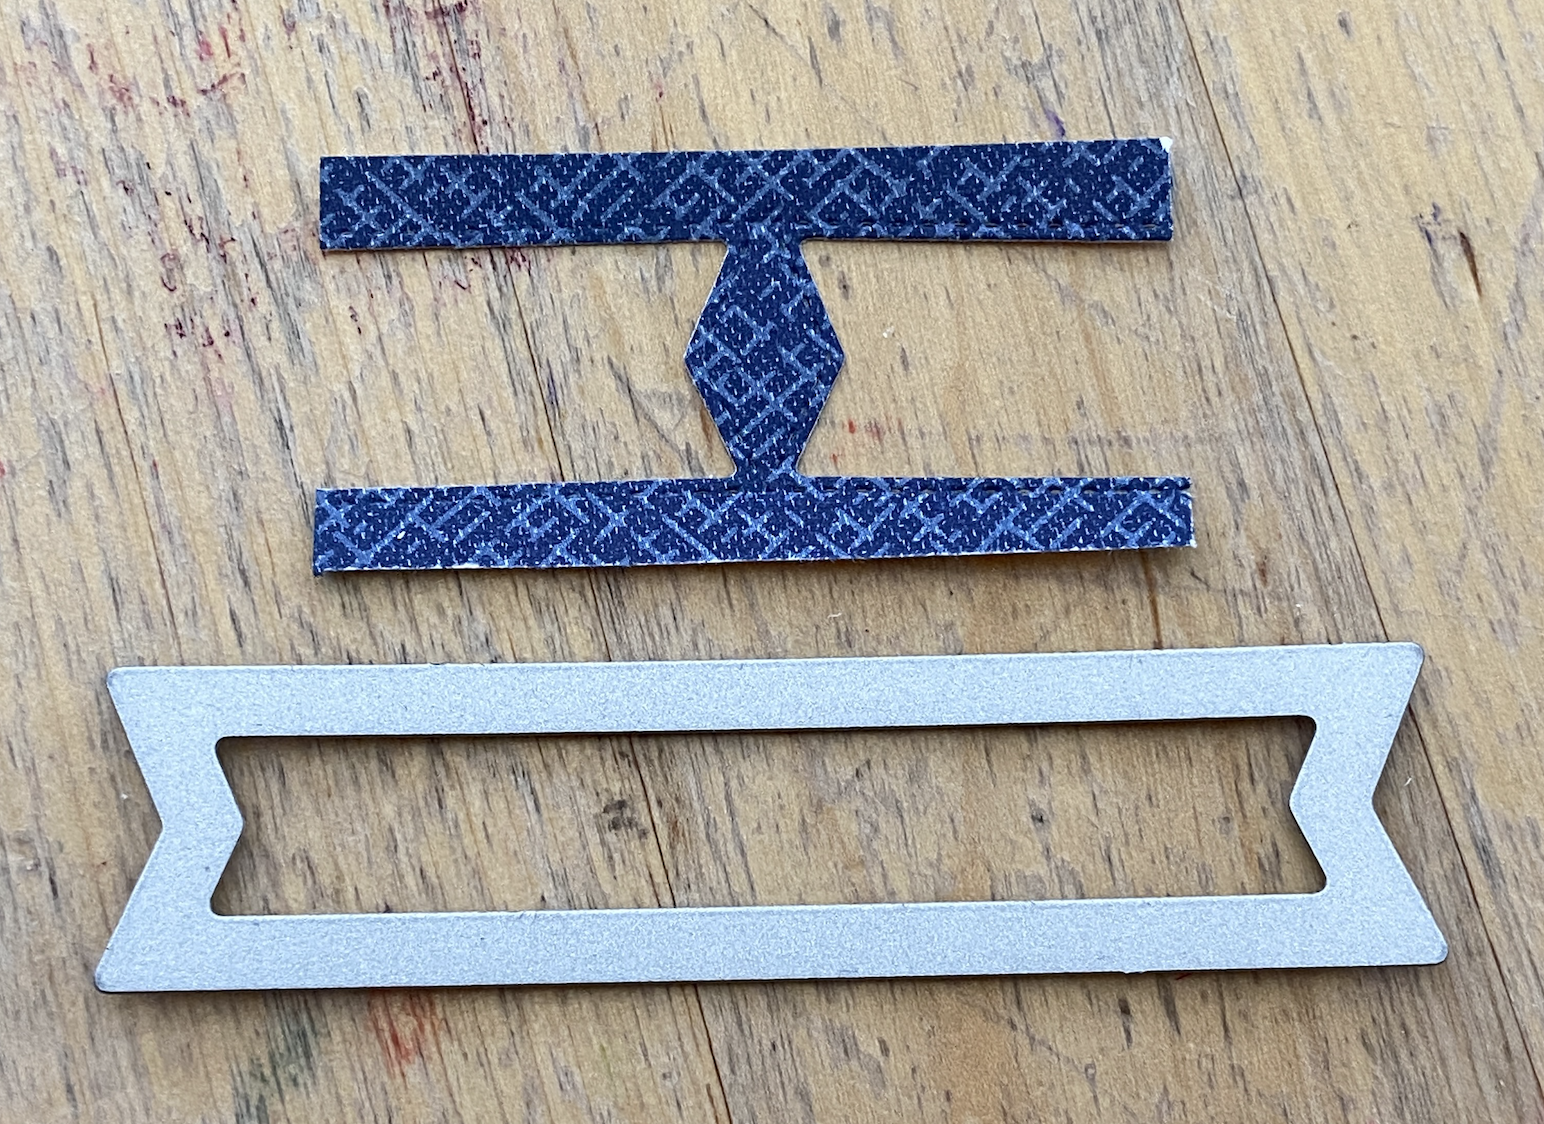
This card uses the second 4″ x 3″ section, framed by a slightly larger piece of coordinating Balmy Blue card stock. The textured cane weave layer is still at 2″, but trimmed to 4″ in length. The little 3/4″ x 2″ section that was part of the initial 6″ x 6″ piece, was used as an accent with the sentiment. I used the pennant die to cut two ends from that one piece. See photo below. The layering circle is Petal Pink.
I really like how these designs came out and hope you can see how they are adaptable to many different patterns of papers, sentiments and textures. This is just one way of Creating Card Designs with 6″ x 6″ Designer Paper. Keep reading to see a different take on 6″ x 6″ paper.
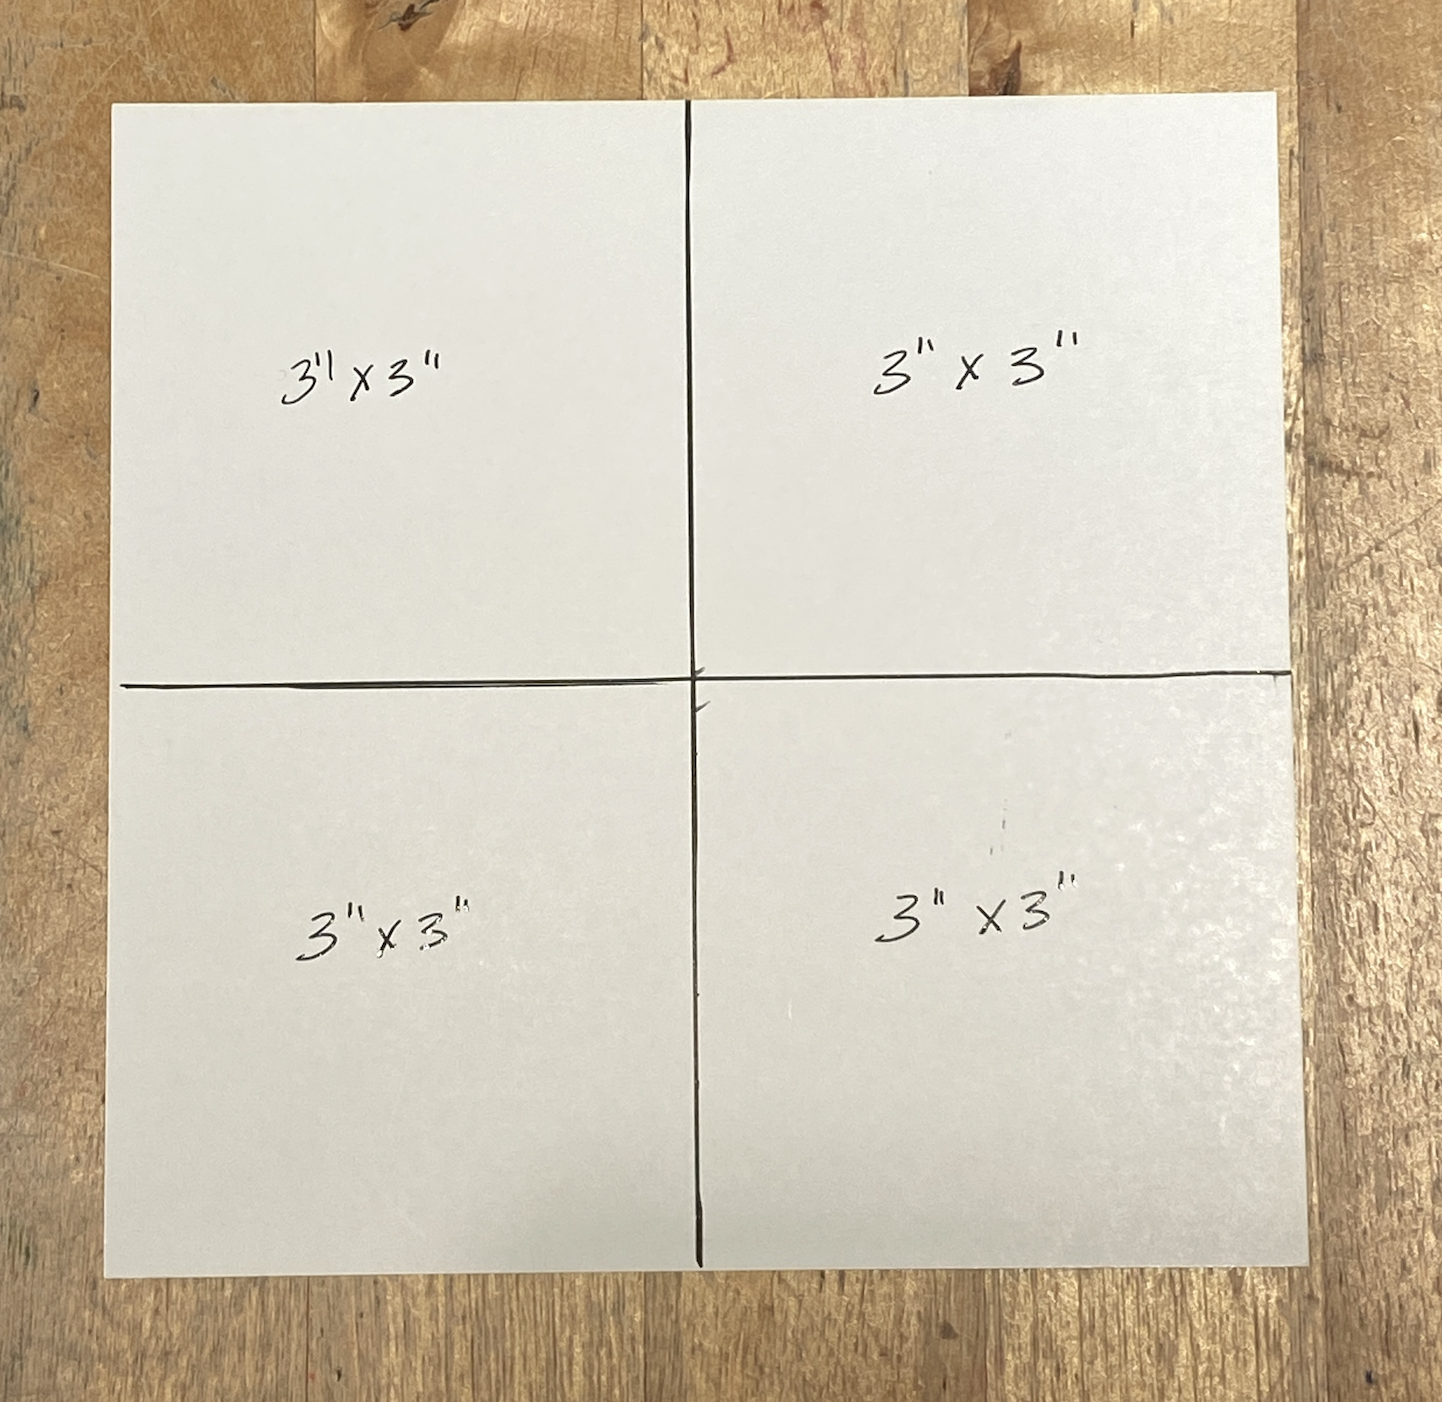
Cutting Template #2: Cutting 6″ x 6″ Paper into 3″ x 3″ Squares
Take your 6″ x 6″ piece of paper and make two cuts, creating four 3″ x 3″ square pieces.
The following five card examples all use a 3″ x 3″ piece of Designer Series Paper. Each card highlights the Regency Park Designer Series Paper and Stylish Shapes Dies, just like in the above examples. The card bases are all made using Thick Basic White card stock and the sentiments are all from Simply Succulents.
Card 1
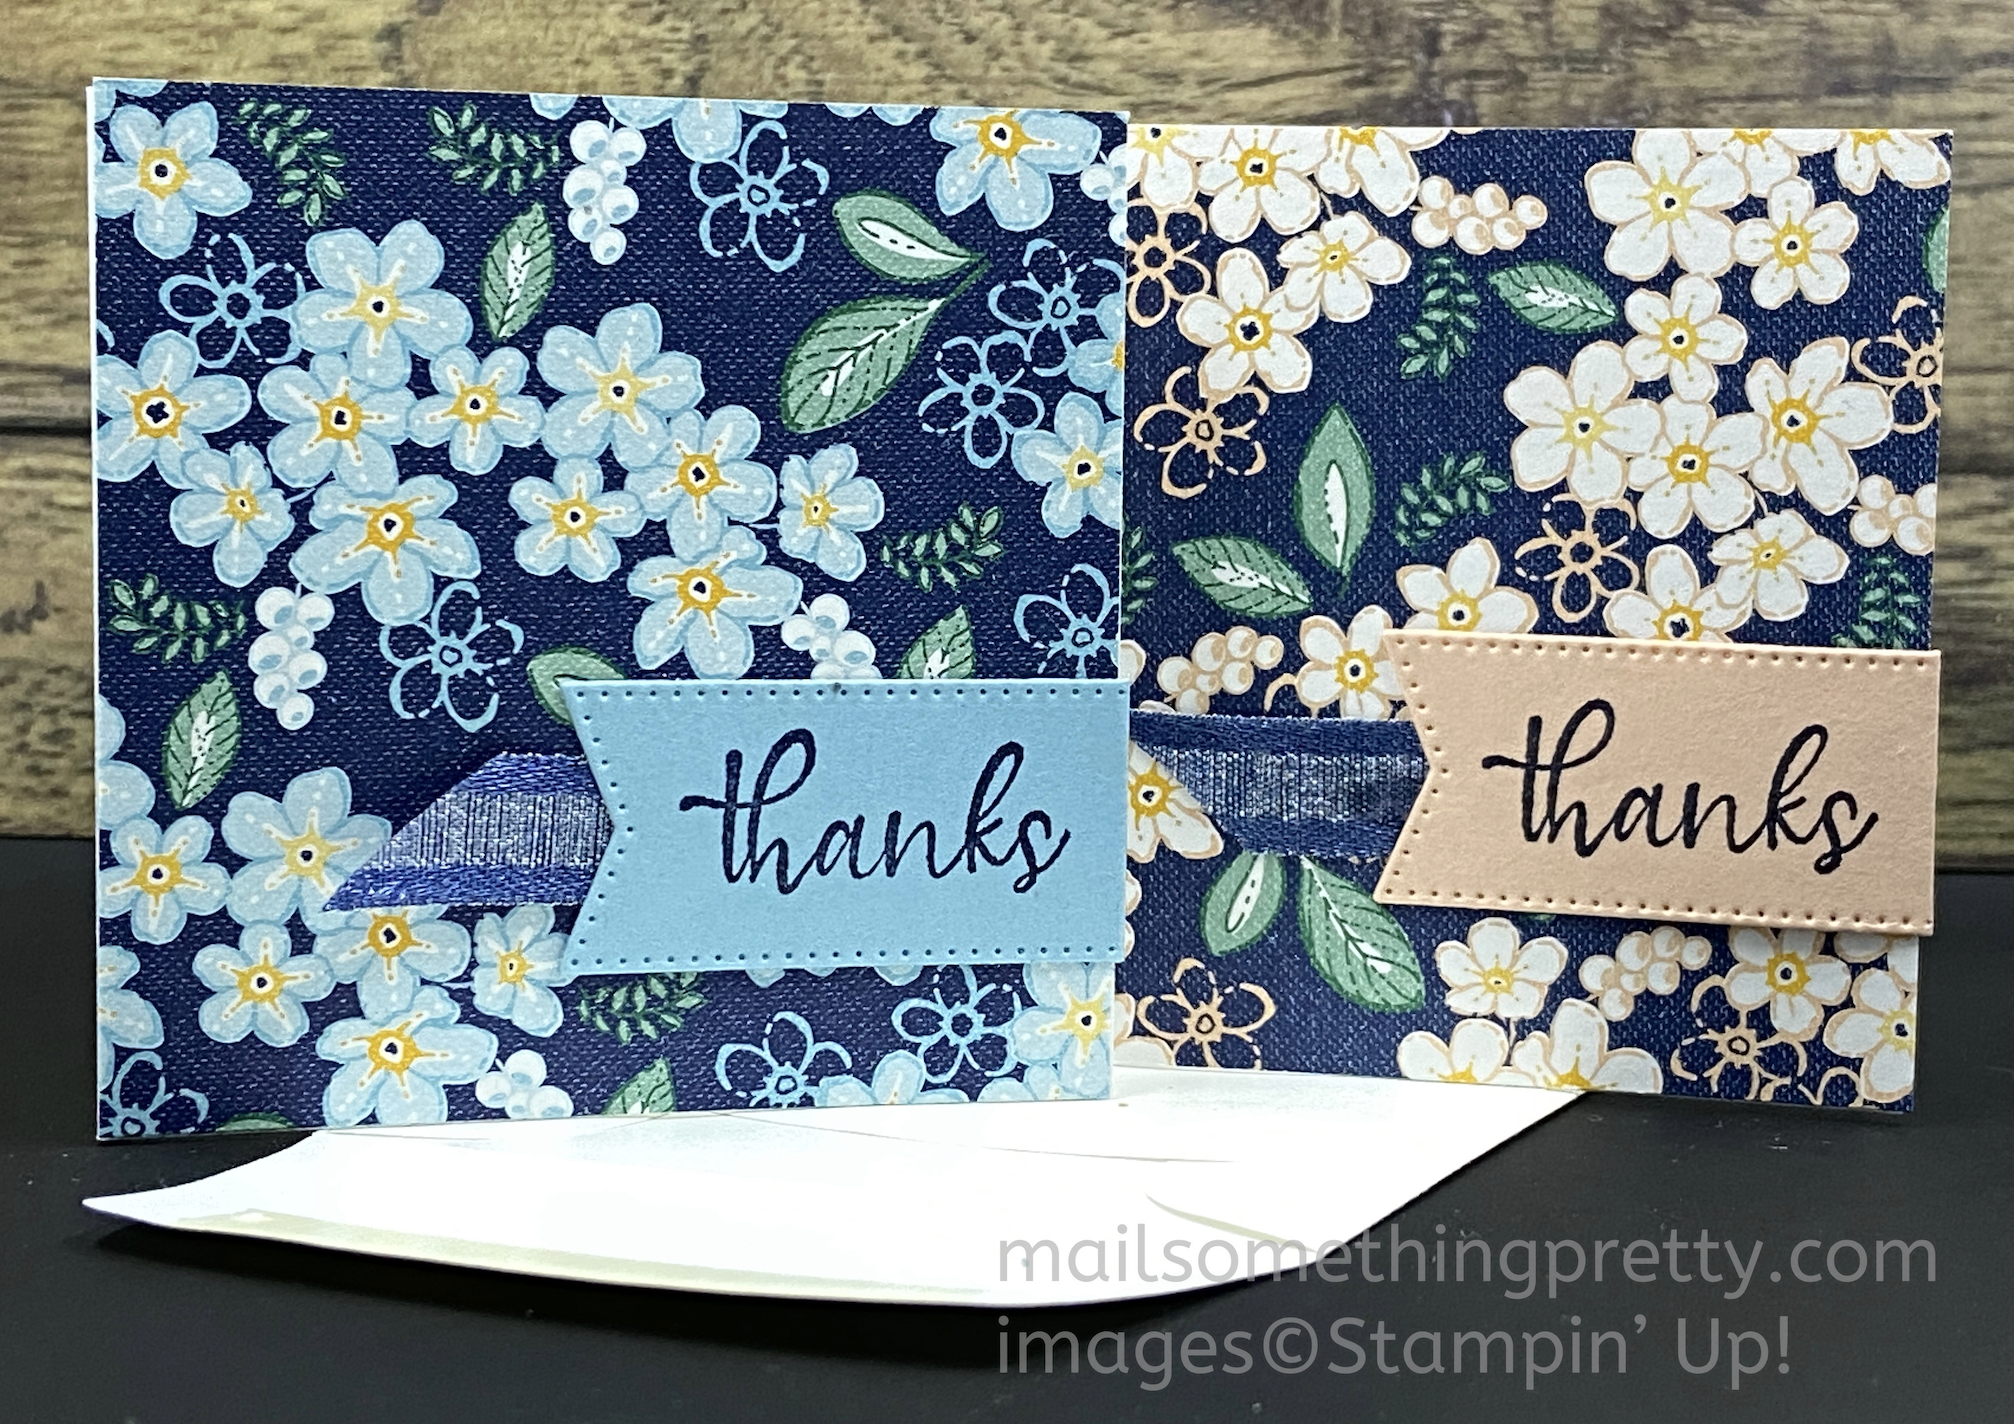
This is a VERY SIMPLE but useful card. It’s a 3″ x 3″ card (with coordinating 3″ x 3″ envelope). This size is not mailable (although you could put it in a larger envelope). They are great little cards to attach to gifts or baked goods, or even to put inside a lunch box. I glued the 3″ x 3″ piece right on top of the card base, with no borders showing. The Thick White card base is sized 6″ x 3″, scored in half at 3″.
Card 2
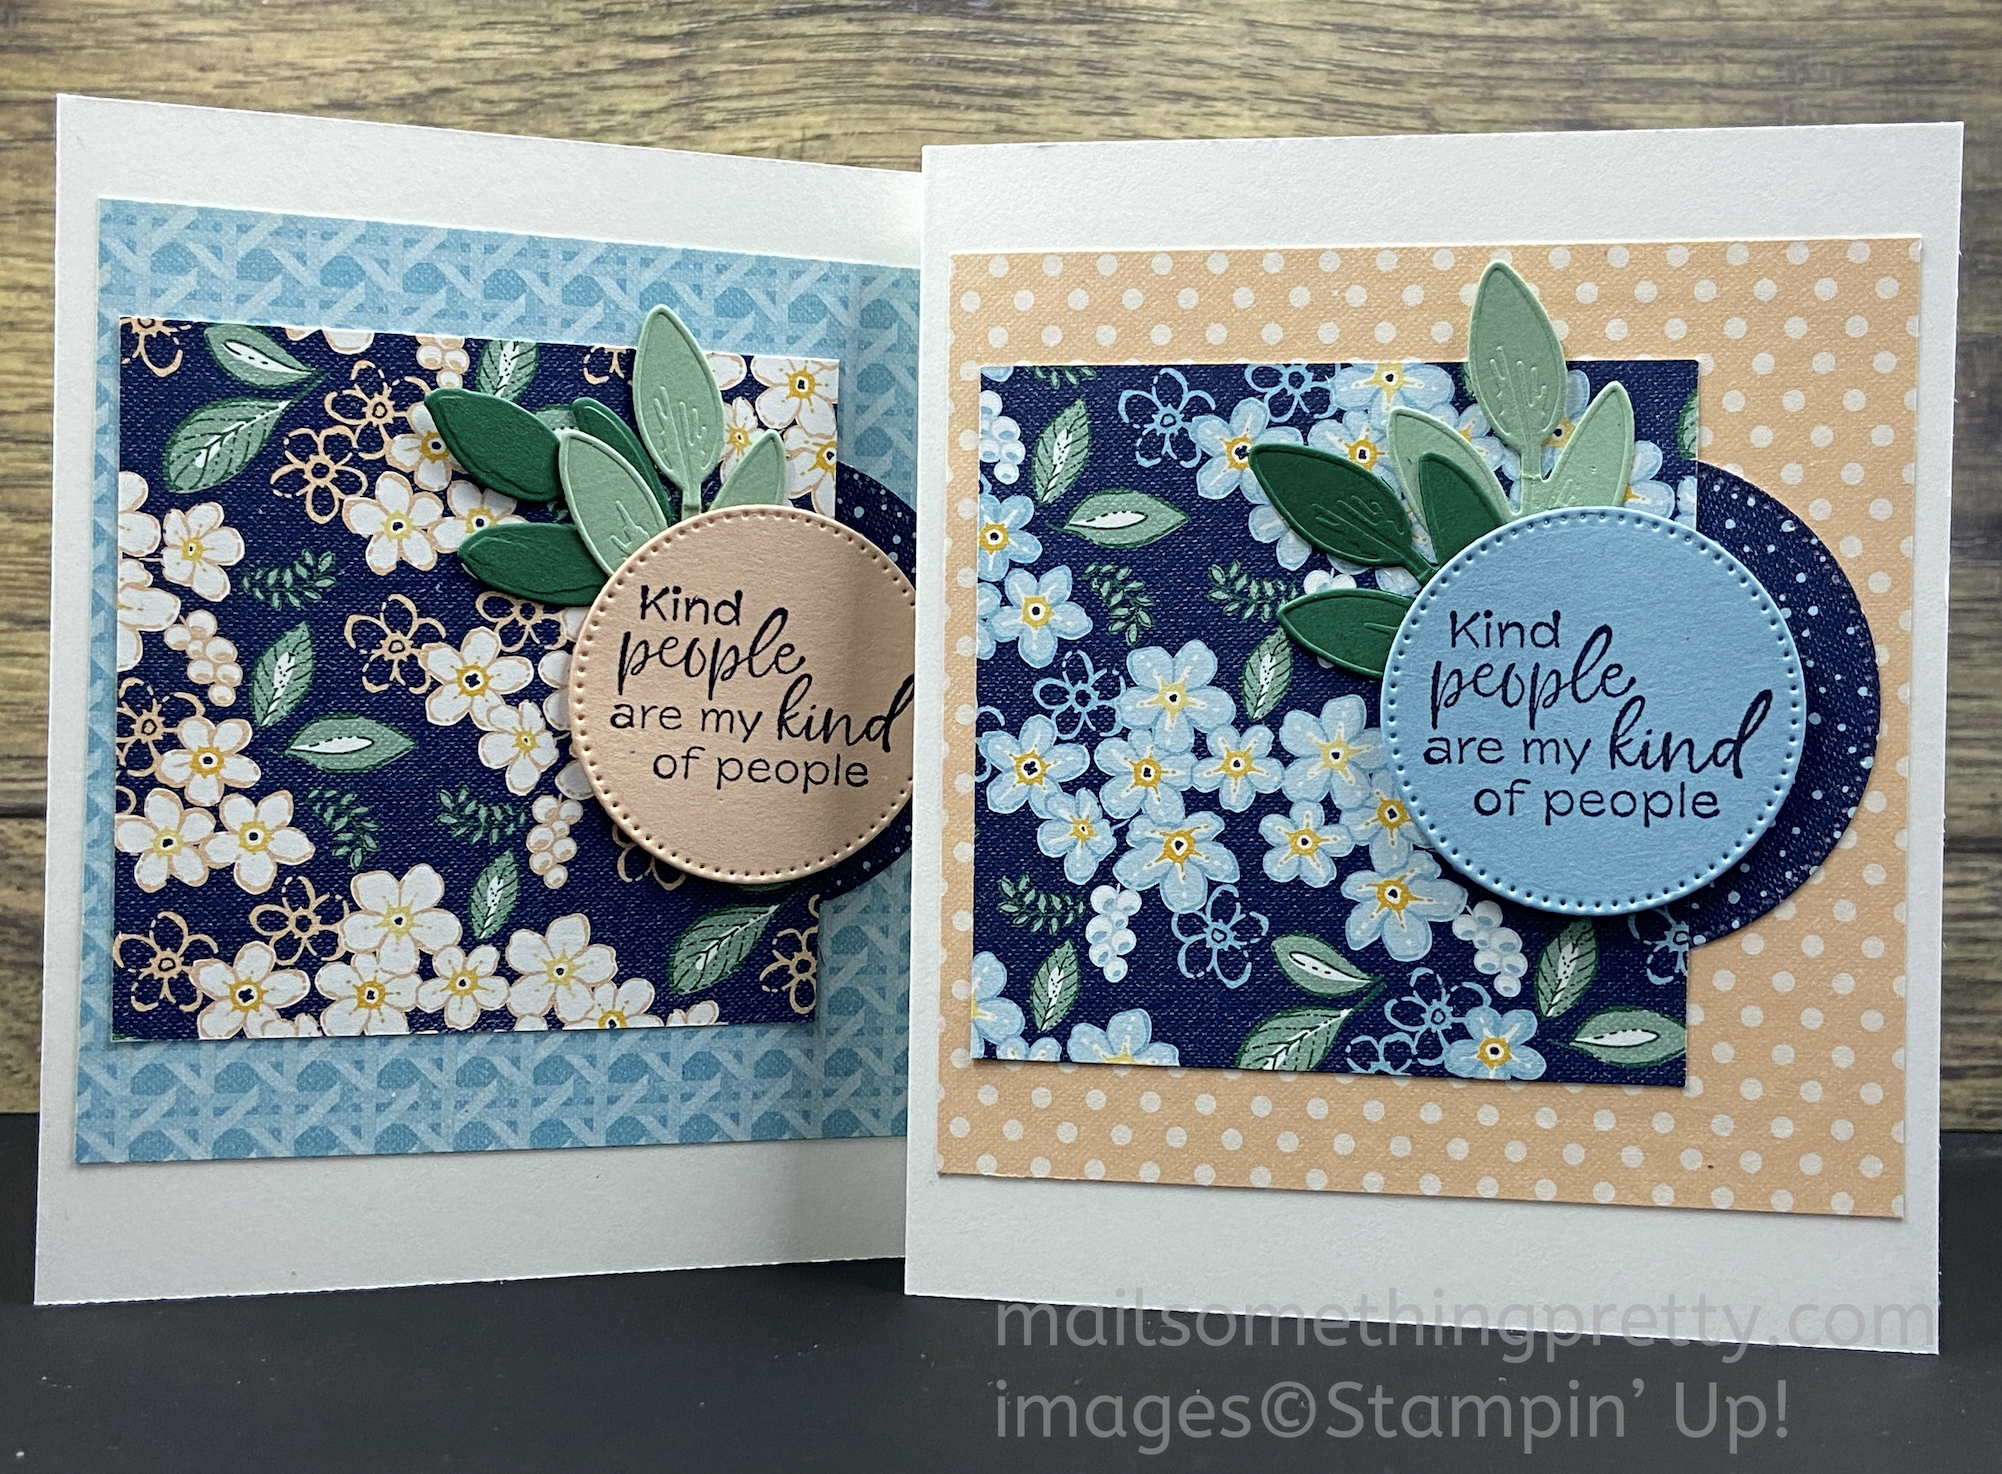
This 3″ x 3″ piece is layered on top of a coordinating 4″ x 4″ piece, from the same Regency Park pack. I cut another pattern from the same pack in a circle shape to layer underneath the circle sentiment. A few leaves were added to match the paper. I altered the card base size by just a little bit, 5″ x 8-1/2″, scored in half at 4-1/4″. You could even make this a 4-1/4″ square card.
Card 3
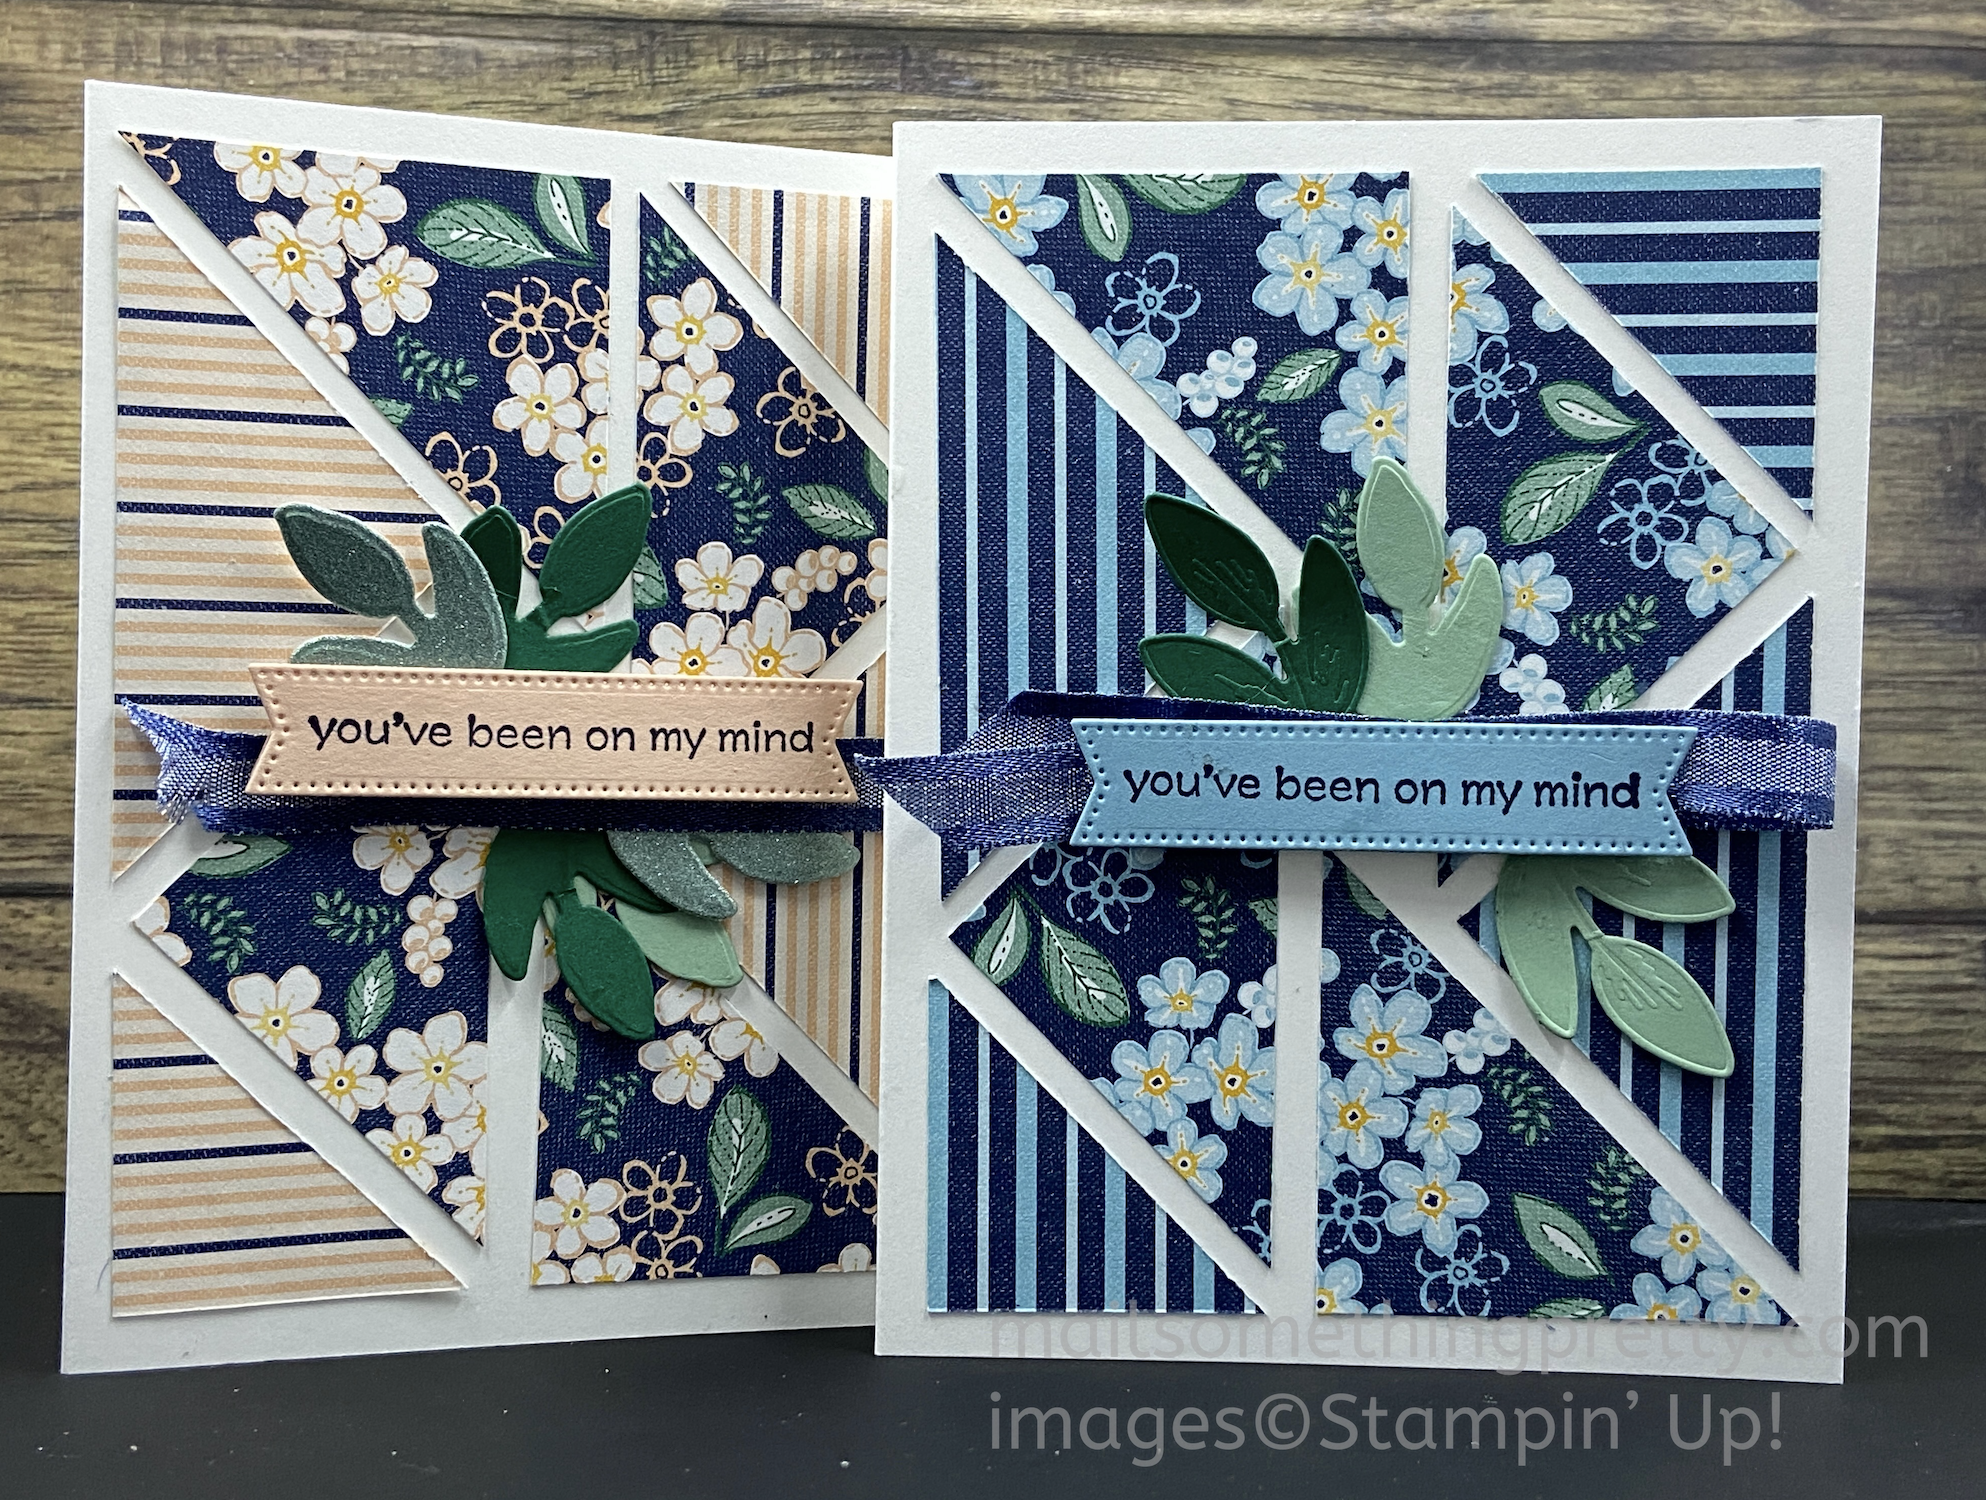
This and the following cards alter the 3″ x 3″ square into different shapes. For these two, I cut the square into four 3/4 x 3″ strips and layered them on top of a piece of 3-1/2″ x 4-3/4″ Basic White. Again, I added a few leaves and some Night of Navy Bordered Ribbon.
Card 4
Turn those squares into triangles!!! Cut point to point with your Paper Trimmer. I added a second set of coordinating triangles (same 3″ x 3″ cut on the diagonal size) to offset the main pattern. Some more leaves and wrapped Night of Navy ribbon underneath the sentiment. And if you like triangles……
Card 5
You need two 3″ x 3″ squares to make all of the triangles for this card. As in the above card, I cut one 3″ square into two triangles. I then cut that triangle into two triangles. And then, I cut one of those triangles into two triangles. The stripes on each card are the reverse of the front flower pattern. When choosing your patterns, be sure you like both sides (or use another piece of paper, pattern or solid).
You can watch how I made all 5 of these cards on a replay of a January 18, 2023 FB live. You’ll see some helpful tips on cutting those triangles too. Here is a link to the Paper Trimmer I use in the video (showing the special triangle cutting technique). It’s my favorite paper trimmer that Stampin’ Up! has created.
If you were like me and didn’t like the 6″ x 6″ Designer Series size, did I change your mind with these layouts? I would love to hear your thoughts in the comments section. Have fun Creating your Card Designs with 6″ x 6″ Designer Paper!
If you are looking for even MORE ways to cut and use your 6″ x 6″ Designer Series Paper, you can read this post with more examples I wrote a few years back: https://mailsomethingpretty.com/cutting-6-x-6-paper-into-fun-shapes/