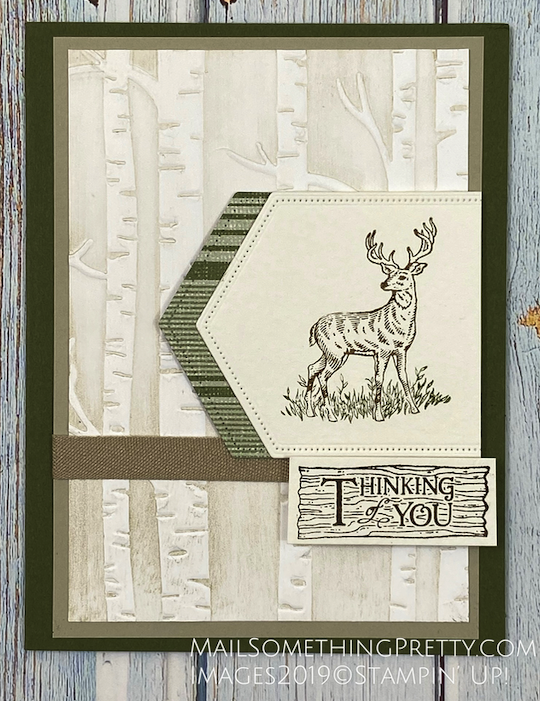
I love how you can use products multiple ways. Embossing folders are great for adding texture to your projects, the true purpose of them. Did you know you can add color to your embossing folders? In this post & video, I will show you how to sponge your embossing folders to create a two-tone effect. You can do this with almost, if not all of your folders. Today’s project focuses on the Woodland Embossing folder. Think about how you can adapt this technique to other folders as well.
My Club met last week and I always try to show them at least one new technique at each meeting. Fall is here and Winter is approaching, so I thought of a masculine card that alludes to a little bit of snow. Watch the video to see how I got this two-tone effect with the Woodland Embossing folder. I will list all supplies I used under the video.
Sponge Your Embossing Folders to Create a Two-Tone Effect Video
Supplies
Stamp Set – Rustic Retreat #150285
Card Stock – Mossy Meadow #133676 cut at 5-1/2″ x 8-1/2″, scored at 4-1/4″, two pieces of Sahara Sand # 121043 cut at 3-3/4″ x 5-1/4″ and two pieces of Whisper White #100730 cut at 3-1/2″ x 5″.
Ink – Early Espresso #147114 and Sahara Sand #121043 Ink Pads. Early Espresso & Mossy Meadow Stampin’ Write Markers, both found in the Neutrals Stampin’ Write Markers set #147158
Watercolor paper #149612 cut with 4″ long Stitched Nested Labels Dies #149638, as well as a scrap of Mossy Meadow striped piece from Come Sail Away with Me Designer Series Paper #149481
Woodland Embossing Folder #139673
Stamping Sponge #141337
Apparently the ribbon I used is retired. Substitutions could be Magnolia Lane Ribbon Combo Pack #149485 or Burlap Ribbon #141487
Snail Adhesive #104332, Snail Refill#104331
Dimensionals #104430
