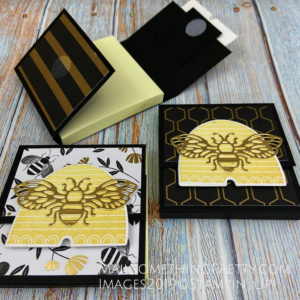
I am 100% behind the bee trend that is happening. Bees are so important to our planet, gardens, food, sustainability and their work ethic is amazing. I have a stained glass bee hanging on my studio window that I bought in Salt Lake City (Utah is the Bee Hive state) when I was there for a Stampin’ Up! event a few years back. I loved seeing bee images on the man hole covers in the streets. So, it’s no wonder that one of my favorite stamp sets in the Jan – June Mini catalog is Honey Bee, with coordinating dies and Sale-a-Bration Designer Series Paper (free until March 31). Keeping this all in mind, I am going to show you easy to make Post It holders using bees as my inspiration.

Easy to Make Post It Holders
I created this video to show you how to make your own Post It holders. You can use any papers you want, but I did include a supply list with measurements for you after the video link.
I forgot to mention in the video to adhere your decoration to the smaller scored section (keep that one on top). Also, I used Thick White card stock instead of the regular weight to give the beehive some strength.
Post It Holder Supplies & Measurements
Basic Black card stock 121045: cut 8-1/4″ x 3″. Scored at 2-1/2″, 2-3/4″, 5-3/4″, and 6-1/4″. Little inside 1-1/2″ x 1-1/2″ square.
Golden Honey Specialty Designer Series Paper Pieces: 2-3/4″ x 2-3/4″, 2-3/4″ x 1-3/4″ and 2-3/4″ x 2″ (this paper sold out while I was filming the video!). Substitute any paper.
Honey Bee Stamp Set*, beehive image stamped with So Saffron ink on Thick Whisper White card stock. Cut an extra white beehive for durability.
Detailed Bees dies*, golden bee cut with Gold Foil paper
*Buy the stamp set and dies together with a 10% discount bundle price 153792
Multipurpose Liquid Glue 110755
Tear & Tape Adhesive 138995
sticky Velcro circles (also called thin clear fasteners)
Please let me know in the comments section how you liked this project and what type of paper and decoration you are going to make your Easy to Make Post It Holders in. I’d love to hear.


