I was lucky enough to be chosen for April’s OnStage Live Display Board to be a sample stamper and I am applying again for this November’s OnStage Local event in New Jersey. It was a wonderful experience to be chosen, participate and challenge my brain to design and create using new products and I would love to do it again. The following photos are my submissions. We are to design/create 3 cards, 2 3D items and a scrapbook page. Feel free to comment if you like them!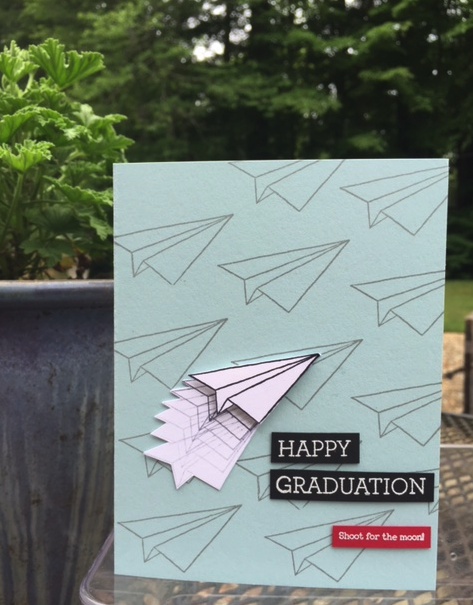 I received this Shooting Star stamp set at OnStage as a “prize patrol” prize. It coordinates with the Sliding Star Framelits and makes fabulous slider cards. Since I do not have the framelits (yet), I had to think of how to use the stamp set a little differently. I love the paper airplane and wanted it to fly through the air. I repeatedly stamped the airplane in a downward motion to get the flying effect and cut it out. I stamped once more for a clean look, cut it out and used a dimensional to make it pop. I used white embossing powder for “Shoot for the moon”, which comes with the set and “Happy” and “Graduation” from the Crazy about You stamp set. I showed it to my 17 year old son and he gave me his approval.
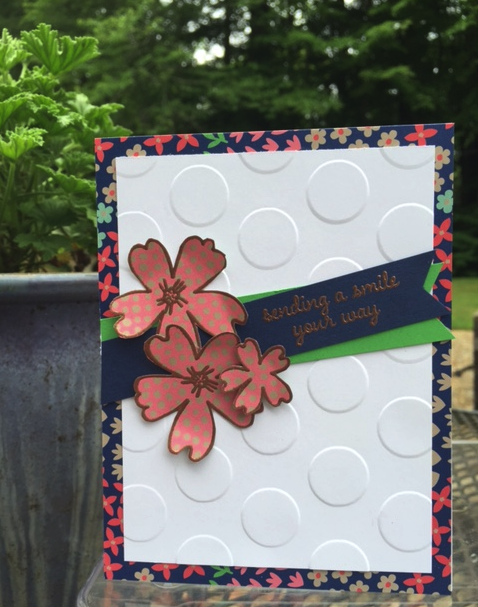 I just love the “sending a smile your way” sentiment that comes with the new Love & Affection stamp set (I also love the two other phrases too). Using the Affectionally Yours Designer Series Paper makes color choices a cinch, so I matched the Night of Navy and Cucumber Crush to make the two banners. New to this catalog is the Copper Embossing Powder which coordinates perfectly with this suite. I decided to emboss right on the designed paper and cut the flowers out with scissors (the old fashion way). I’m so glad Stampin’ Up! kept the Polka Dots Textured Embossing Folder because it makes a great background. Who wouldn’t love to receive this smile in the mail?
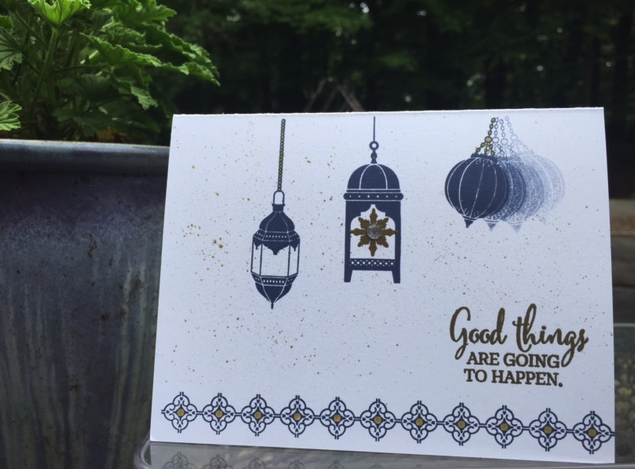 This Moroccan Nights stamp set was highlighted by both Shelli & Sarah at OnStage. They both made their own cards using the set and they were both completely different. My interpretation is also a bit different from theirs – isn’t that what makes a stamp set great? I don’t have the coordinating Moroccan Designer Series Paper (again, yet) so I decided to make this a one layer card. I was actually inspired by a totally different Designer Series Paper (Floral Boutique) because I am absolutely in love with Navy & White. The sparkle doesn’t quite show in this photograph, but the “Good things are going to happen” (from You’ve Got This stamp set) and light from the middle lantern are embossed in gold. I did some coloring with my Gold Wink of Stella on the bottom border, the lantern chains and a little flick action to make the spots. I confess, I used my stamp-a-ma-jig to get everything to line up perfectly. Here’s a tip: be careful with smudging when using the stamp-a-ma-jig and Whisper White card stock. I had to keep washing my fingers and made a several samples until I got it just right.
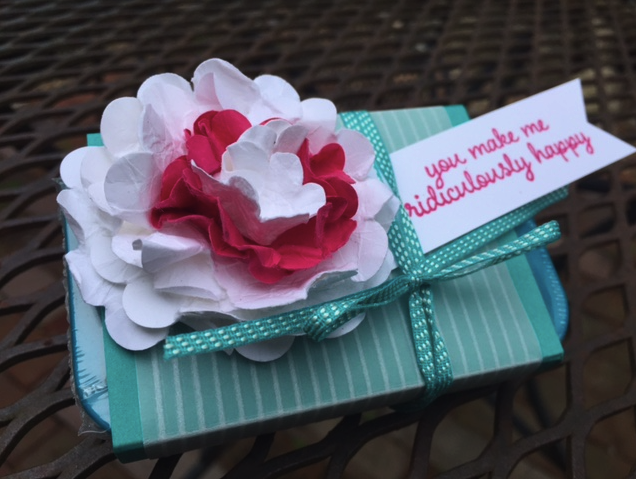 I made these treats as pillow gifts for my roommates at OnStage. They are really easy to make using a Wintergreen Altoids tin. I used a 3 1/4″ x 7″ piece of Bermuda Bay card stock and scored it at 1 1/2″, 2 3/8″, 4 3/4″ and 5 5/8″. I cut a 3″ x 7″ piece of Vellum and scored it at the same dimensions. I also used my Simply Scored Scoring Tool to score at every 1/8″ mark to give it a striped look. Fold on the score lines, wrap and adhere to your tin. I have to admit that I made this treat this morning and removed the flower from an extra one I made in April. As I am writing this post, I realize that the Scallop Circle punches are no longer available and today is the last day for applications. Instead of using the Scallop circle punches, you can substitute the Layering Circle Framelits (the scalloped ones). I cut 2 larger white ones, 1 smaller Melon Mambo one and one smaller white one. Crumble them each up so that they are really wrinkly and the fibers of the paper is broken down. You can then separate each layer into two pieces. Line them up on top of each other and use either a brad or glue to stick them together. Fluff to desired fullness. I made this banner label with the Love & Affection stamp set. Tie some 1/8″ stitched Bermuda Bay ribbon around the tin and you have a sweet treat.
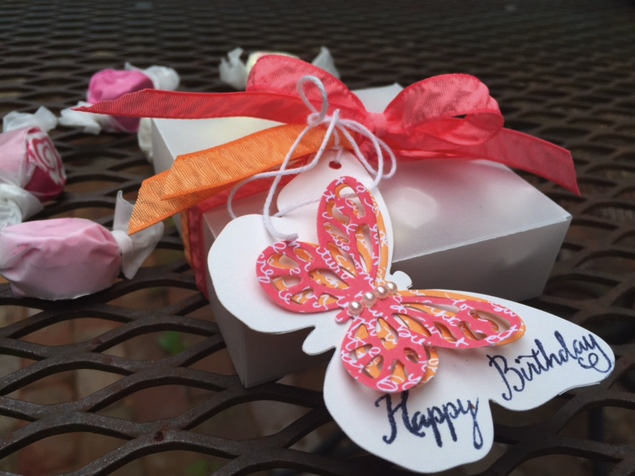 This “pizza style” box is made out of Vellum paper. It’s a great box to make and I learned how from Mary Fish many years ago (these are her directions: http://stampinpretty.com/?s=pizza+box). I filled mine with Salt Water Taffy and used the colors of the taffy to indicate how to decorate the outside. The new 3/8″ Ruched Ribbon is delightful. I used both Flirty Flamingo and Peekaboo Peach ribbons. I cut the butterfly out of Shimmery White card stock and my Bold Butterfly Framelits. I used the same framelits to cut out the two smaller butterflies from the 2016-18 In Color Designer Series Paper Stack. To stamp “Happy Birthday” (from my favorite Balloon Celebrations stamp set), I used my Night of Navy Stampin’ Write Marker and colored the words separately because I needed more space in-between the words to make it fit on the wing.
 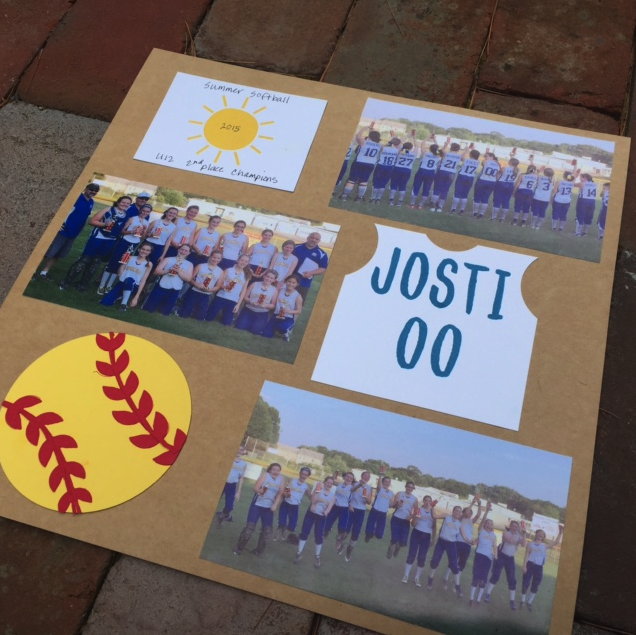 I am much more of a card maker than a scrapbooker, but these challenges are good for my brain. My daughter was on the travel summer softball team last summer and they ended up coming in 2nd place overall – what a nail biter of a game. You can see how happy they are in these photographs. This layout is very simple, but I think sometimes simpler is better than cluttering up a page. Softballs were white when I was growing up, but are now yellow and I think Daffodil Delight is a pretty close match. I used the die from the Botanical Builder Framelits to make the stitching and cut two each and glued back to back. For the team shirt, I just used some circle punches to cut out the neck and sleeves. I love how she picked the number 00 because Robert Parrish of the Boston Celtics, who was very tall and played in the 80’s was 00 and my daughter is very tall too. She’s the one in the middle. I did just a little journaling on an old Project Life card, but I think the sun on the card matches perfectly.
Thank you for taking a look at my creations. I am looking forward to making lots of things to share with you once my order comes in with all my new products.